This post is about 29 OneNote productivity tips that you can use to be get the most out of your digital notebook. If you use OneNote every day or are thinking about getting started with it, this post is for you.
You can download OneNote for free from its website. It also comes as part of the package if you use Microsoft 365.
The digital notebook has a wide range of features and available on all operating systems and platforms. Like the tagline suggests, "Discover the power of your notes on all your devices."
In fact, you can also access it on the web at onenote.com.
I have been using this app for some two years now. It is a simple digital notebook but also a tool to capture my insight about books I read, blog planning and writing and meeting note-taking.
Before we begin, I recommend you watch this quick video to see how powerful this tool could be for your productivity:
Convinced?
I'm glad you are.
Alright, let's dive in.
1. Use OneNote on the Web as a productivity booster where it is lacking in Mac
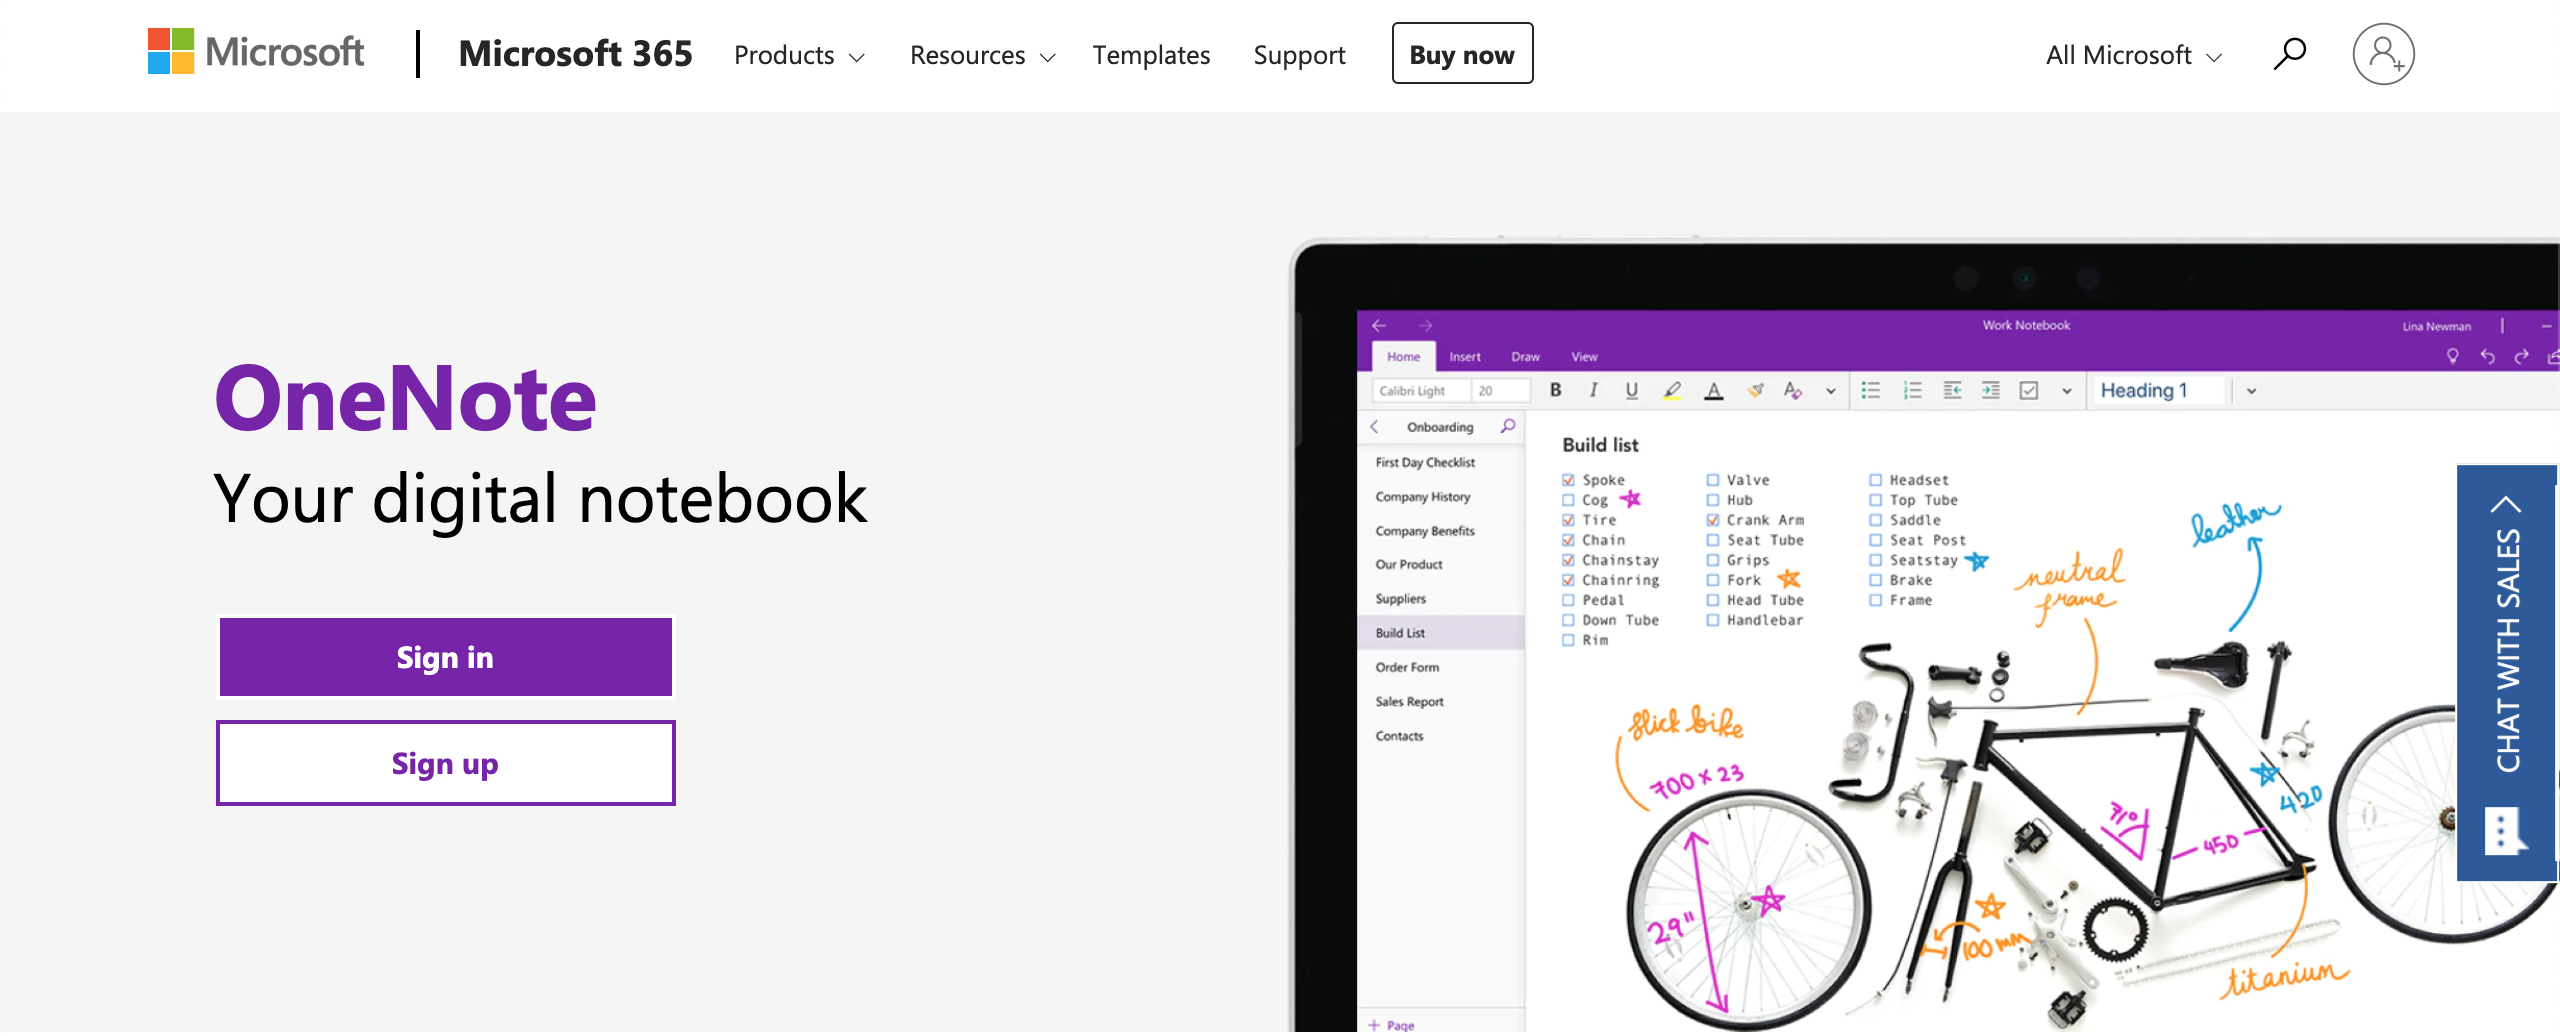
It's important to point out, as a productivity booster, the OneNote for the Web to Mac users as a lot of the features that are available on Windows are not available on Mac.
An example that is most striking to me is the ability to set expiration date for the link you share to your notebooks or pages. If you use Mac, you will have to use the web version to access this feature.
There are many more features that are missing on Mac that you can get on the web version of OneNote.
Click here to access OneNote for the Web.
2. Share your notebooks or pages for productive collaboration
Productive collaboration requires shared access to, and working on, the same files by all team members. OneNote has deep linking structures for you to share your notebooks and pages.
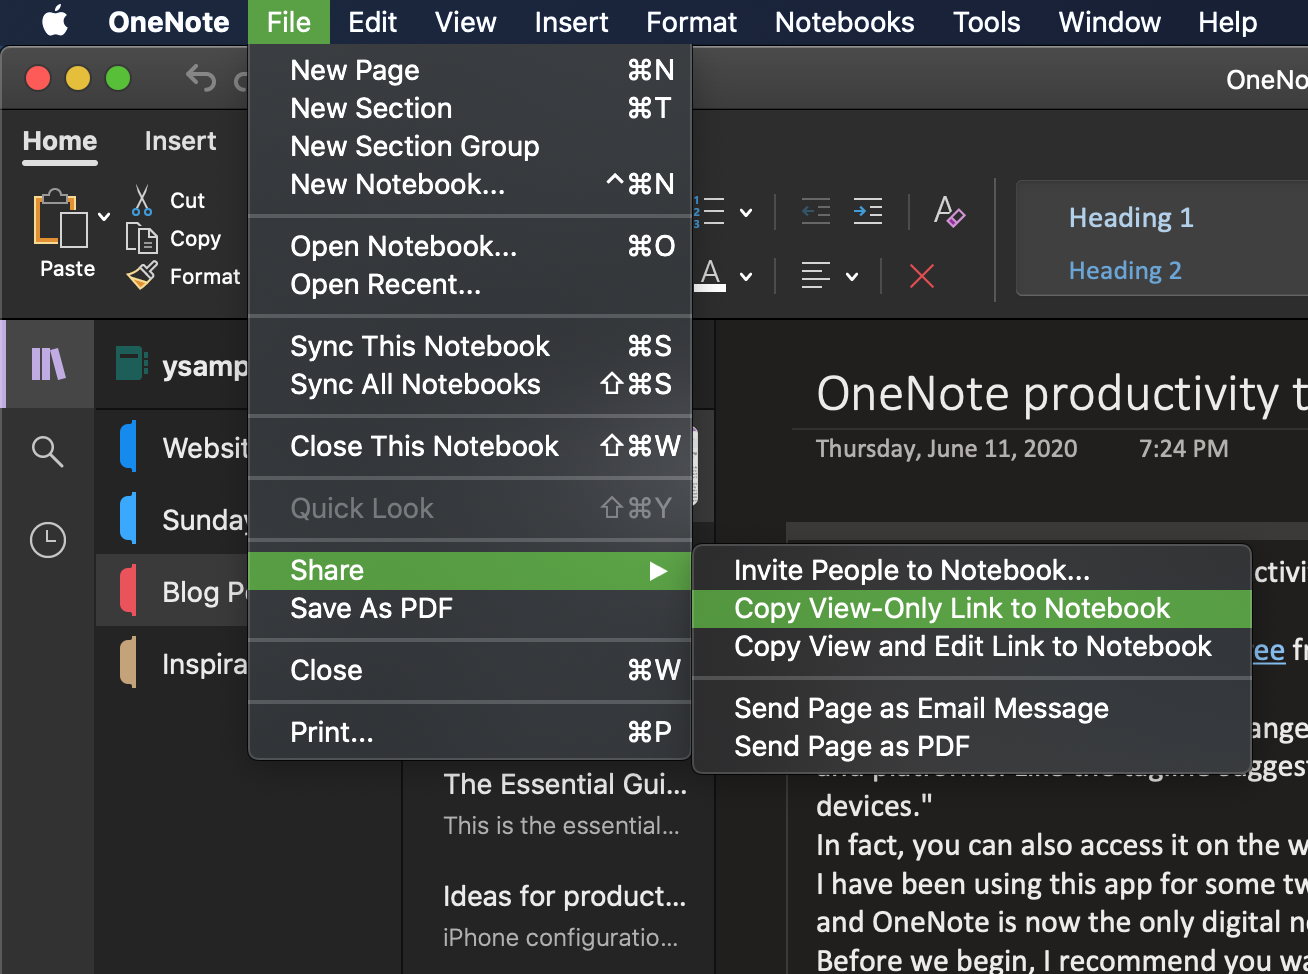
To share a link to your notebooks on Mac, click File > Share. There are three sharing options for notebooks:
- Invite people to notebook or pages. By default, people can edit the notebooks to which you invite them, but you can also change the permission settings to view only.
- Share view-only link to notebook. This generates a link that you can copy and share with anyone you want. The recipients cannot edit the notebook or page.
- Share view-and-edit link to notebook. People with this link can both view and make changes to your notebook.
While Mac users cannot set the expiration date for link sharing on OneNote for Mac, you can still do it by using NoteNote for the Web.
There are two ways to share pages:
- Send as email message. This will open turn the text on the page into an email text in Microsoft Outlook.
- Send a page as PDF. This option converts the OneNote page into a PDF file and attach it to your email. However, the conversion does not work properly yet.
The sharing options on Mac are limited and need further improvements and even fixes. As a Mac user, you might be better off using the ones available on the Web version of the app.
3. Copy link to paragraph
This is a little known feature in OneNote.
This feature lets you create a link to a paragraph. You can place the link anywhere across your pages and notebooks. When you click the link, it takes you to the target paragraph.
Here's how to create and add link to paragraph in OneNote:
- Move your cursor any where in the paragraph you want to link.
- Tap with two fingers next to the paragraph the link should point to.
- On the shortcut menu, click Copy Link to Paragraph. The link to the selected paragraph is then copied to the Clipboard.
- Click the location on the page where you want to place the link.
- On the Edit menu, click Paste. Alternatively you can just press Command+V or tap with two fingers and choose Insert Link. OneNote inserts a link that, when clicked, displays the target paragraph.
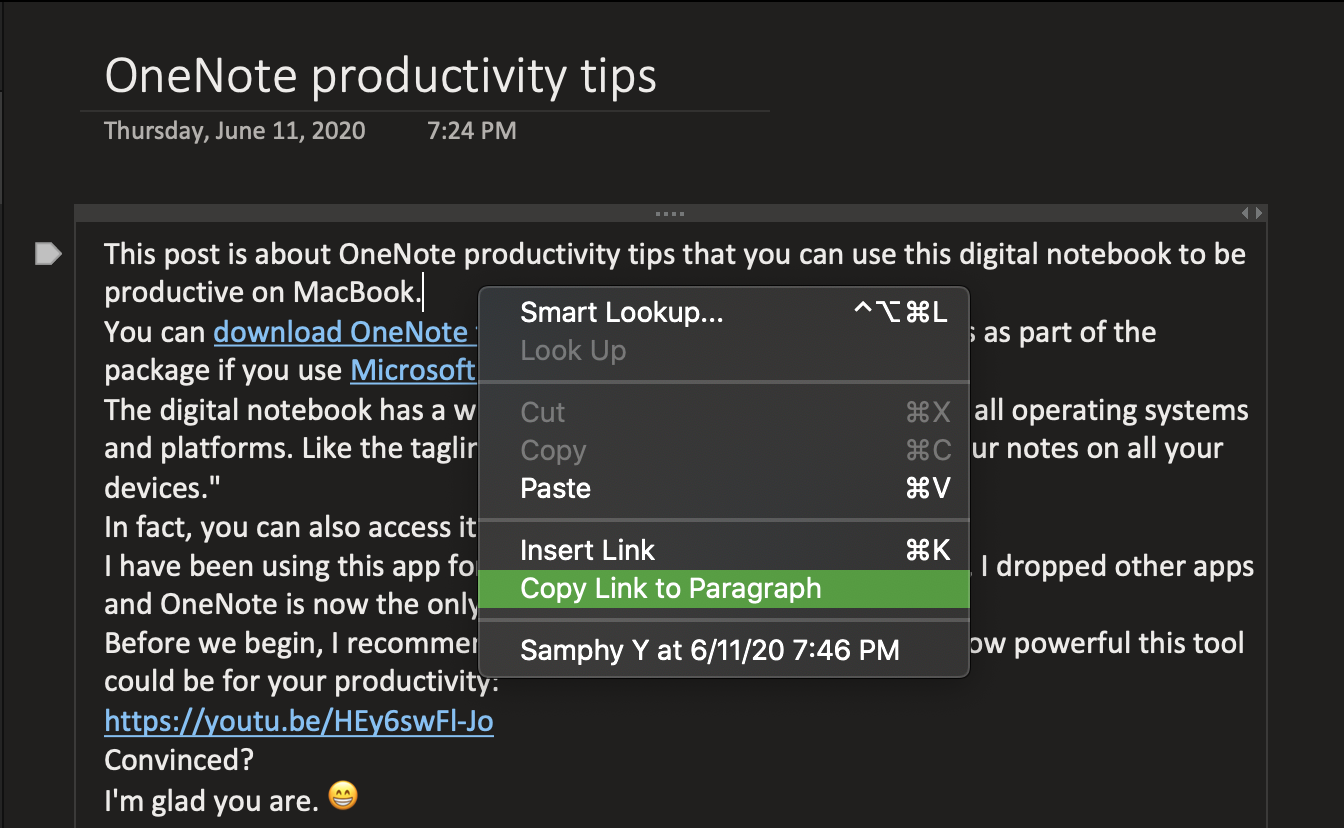
Here's how to copy link to paragraph in OneNote
You will find Copy Link to Paragraph helpful when you write a report or book and need to create references.
4. Link to pages
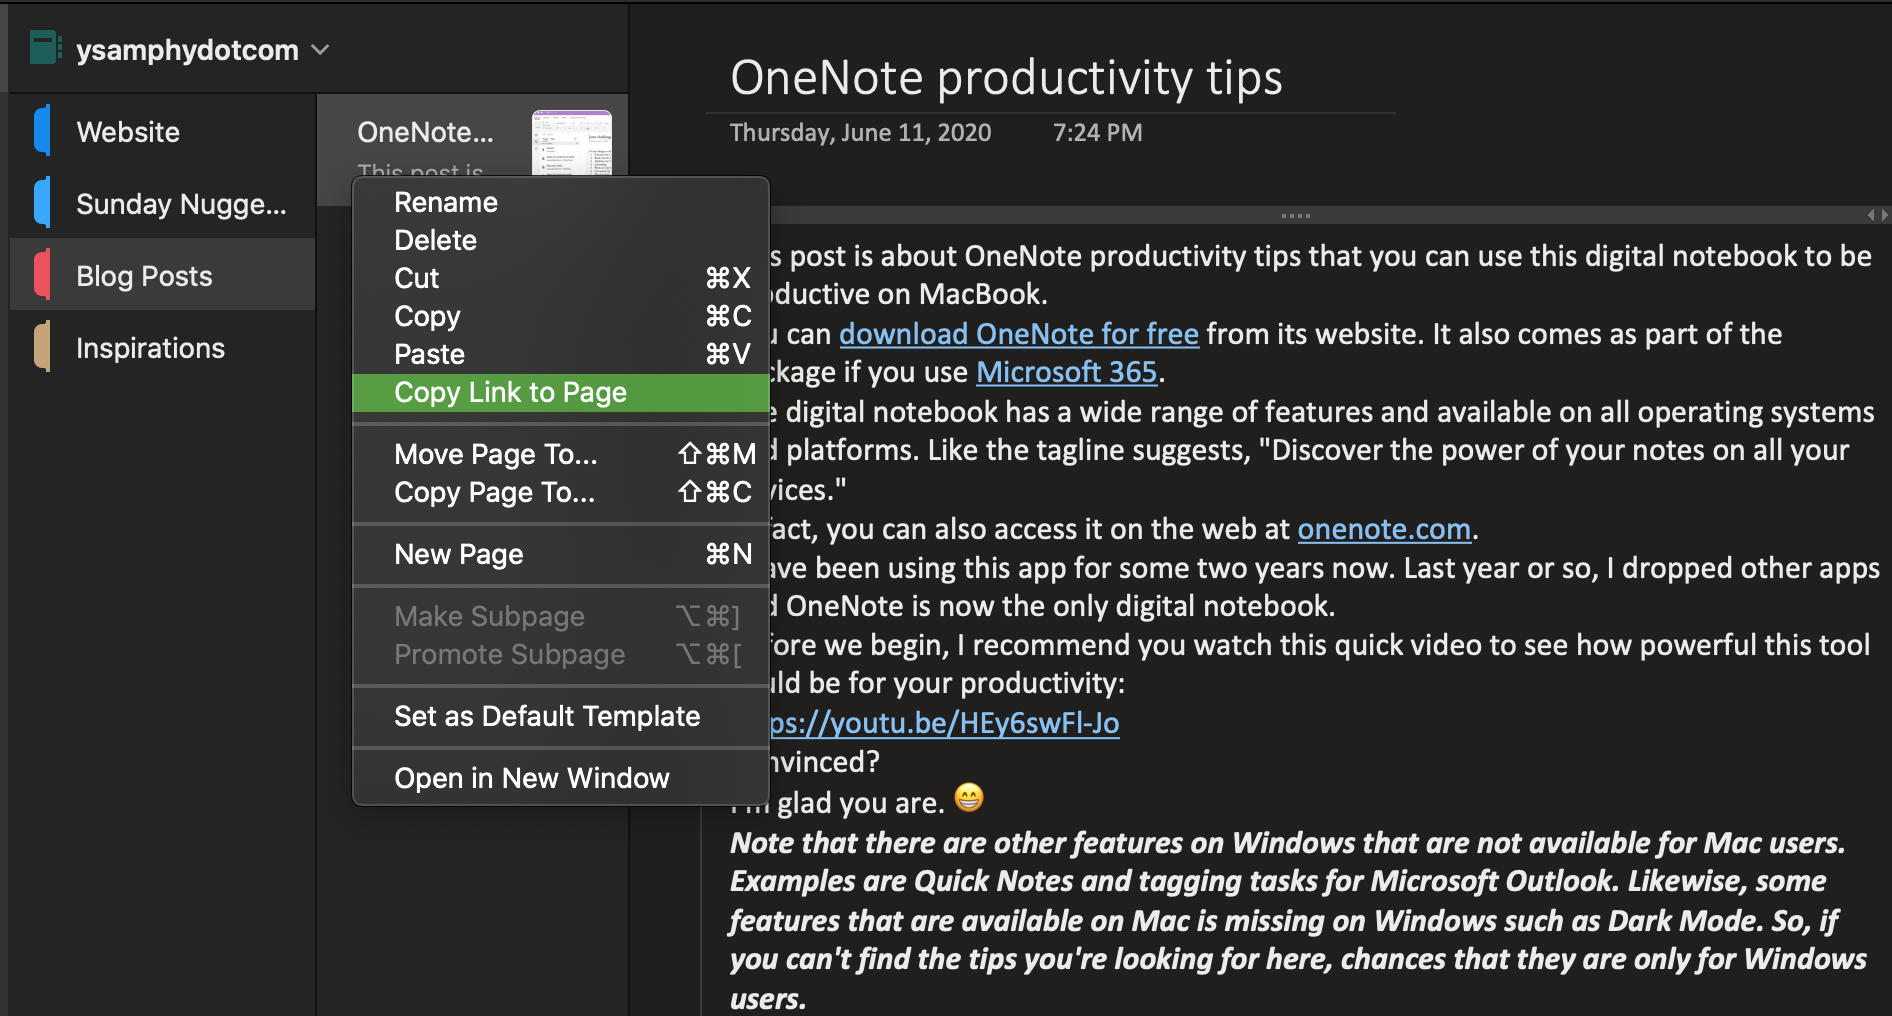
It's easy to create and share links to specific pages in OneNote. Follow the steps below:
- In the page pane, right-click the page that the link should point to.
- On the box, choose Copy Link to Page.The link to the selected page and the title of the page are copied to the Clipboard.
- Then, right-click the location on the target page, and from the box, choose Paste. OneNote inserts a link and the title as an anchor text.
5.Collaborate in real-time to boost team productivity
OneNote gives you the ability to collaborate productively with your team and other people you choose. No other people can access your notebook without your permission.
Even those you share and collaborate your notebook with cannot share it with others. Only the owner of OneNote notebooks can share access with others. Editors cannot.
For collaboration, I recommend that if possible, you share your notebooks with only those who have a Microsoft account. It's important to know who change what in the notebook especially when collaborating with several people.
So, with that in mind, here's how as a Mac user, you can share your OneNote notebook for collaboration with others:
- Go to File > Share > Invite People to Notebook
- Then, just type the email address of the people you want to collaborate with and if you want, add a message you want them to read.
The version history in OneNote keeps track of all changes made in your shared notebook and pages and you can easily search and filter changes.
That's a must-have feature for effective remote collaboration.
If you want more details about OneNote's Sharing and Collaboration, definitely watch the video below:
6. Search efficiently across all your notes and notebooks
Did you know that you can search efficiently across all your notes and notebooks in OneNote?
The search queries pull out the results from all your notes and notebooks and they also tell us which notebooks the notes belong to. In fact, they also show the notes from the notebooks that you don't open on your device.
You can even filter your search results by pages, tags and notebooks.
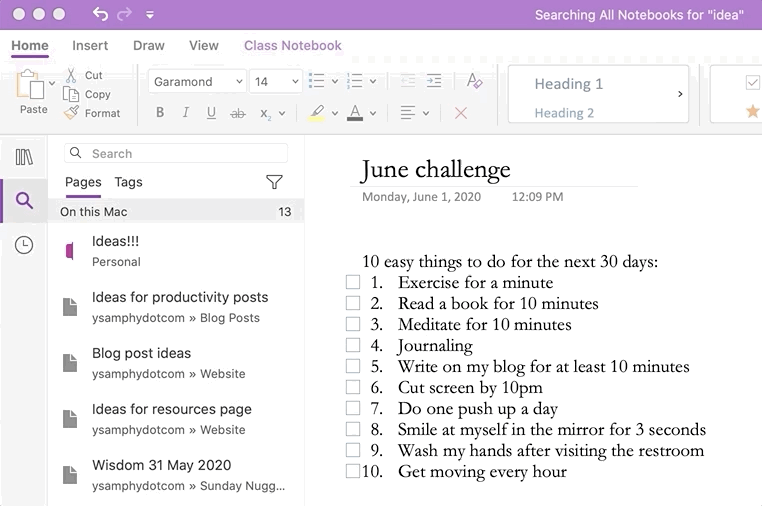
I find the search functionality in OneNote very useful.
It is so easy to find your notes, which is not so if you use a physical notebook.
7. Draw and hand-write to bring your note to life
If for some reason you do not want to type on your Mac, OneNote also gives you the ability to draw and hand-write your notes with a your finger, a pen, or even a mouse. You can also choose from a shapes gallery instead of drawing freehand.
How do you do it?
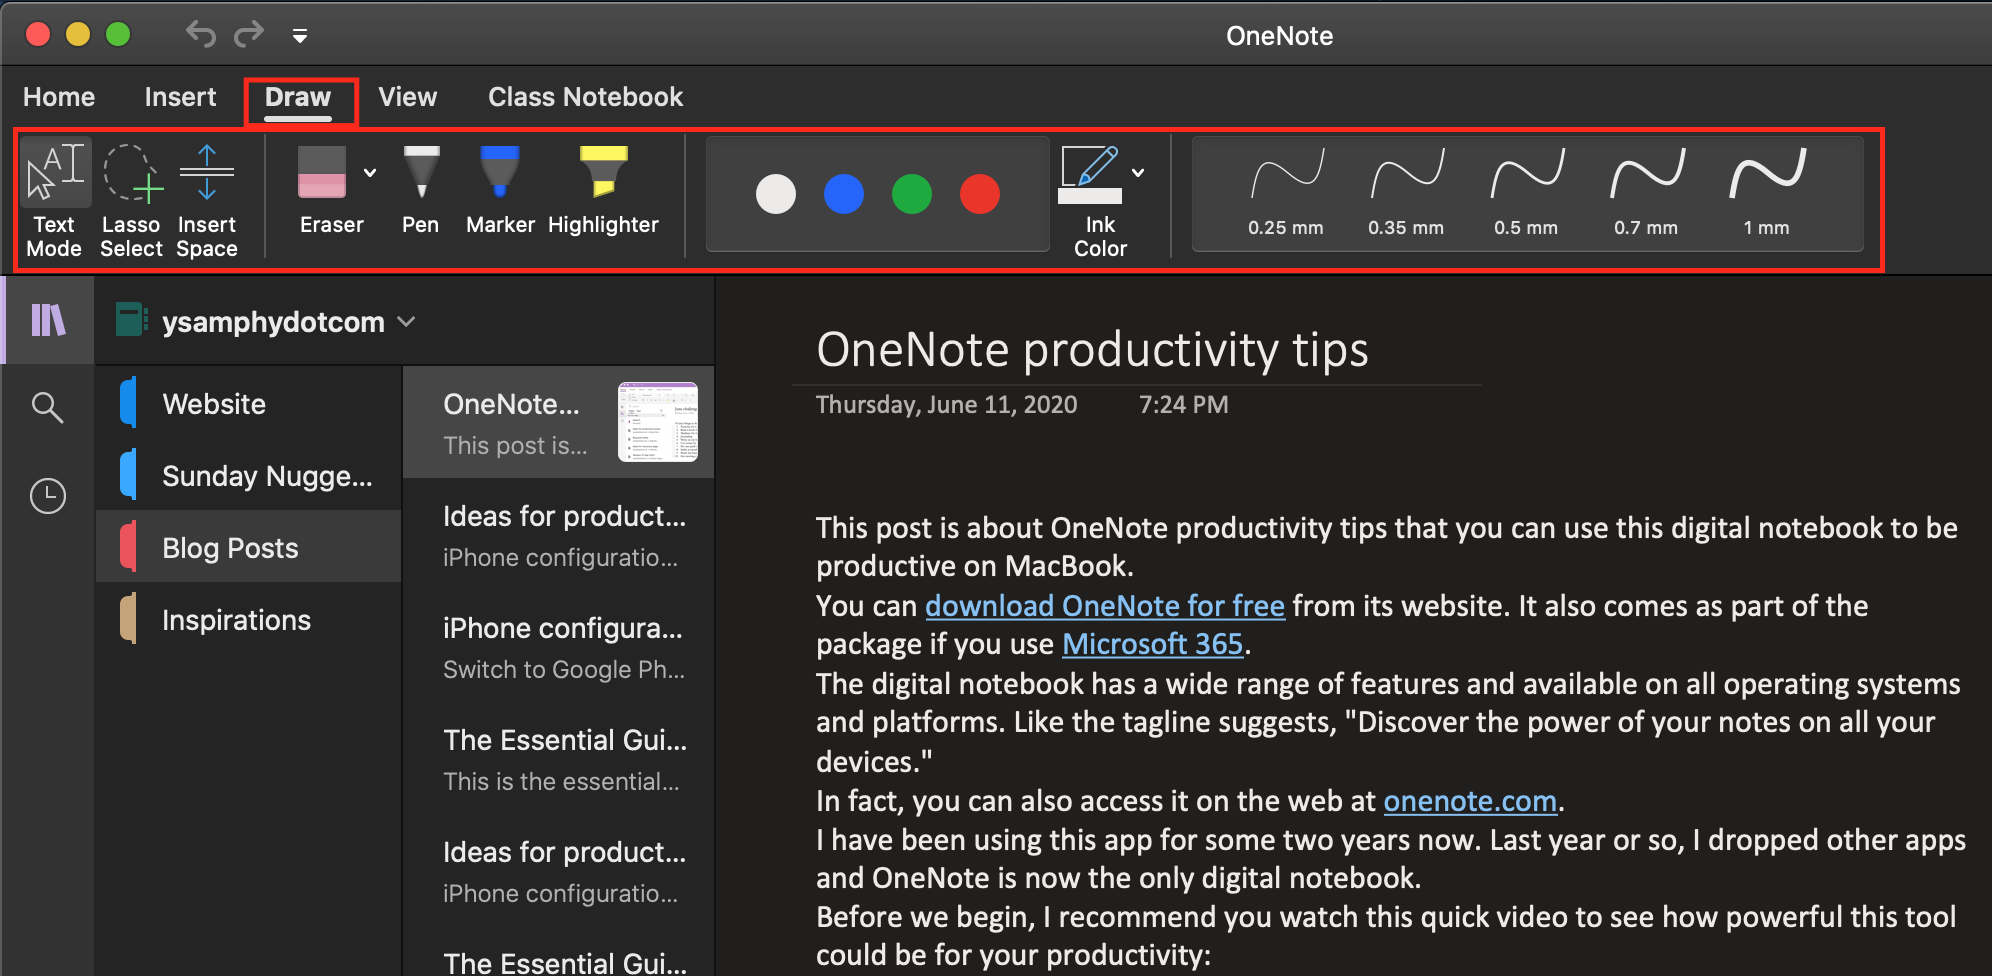
There are a variety of tools available in OneNote to draw your notes to life!
In OneNote for Mac, click on Draw. There, you find a wide range of features you can use to bring your note to life.
Click here to learn how to draw and sketch on devices other than Mac.
8. Voice record your ideas
If writing is not your style, then the voice recording on OneNote will come in handy. You can also use voice recording during a lecture, Q&A session, or an interview. In fact, this feature can be a good OneNote productivity tip everyone should use.
To record voice in OneNote, just choose Insert. To the right of the ribbon, you will find the Audio Recording. Just click on it, it automatically records it.
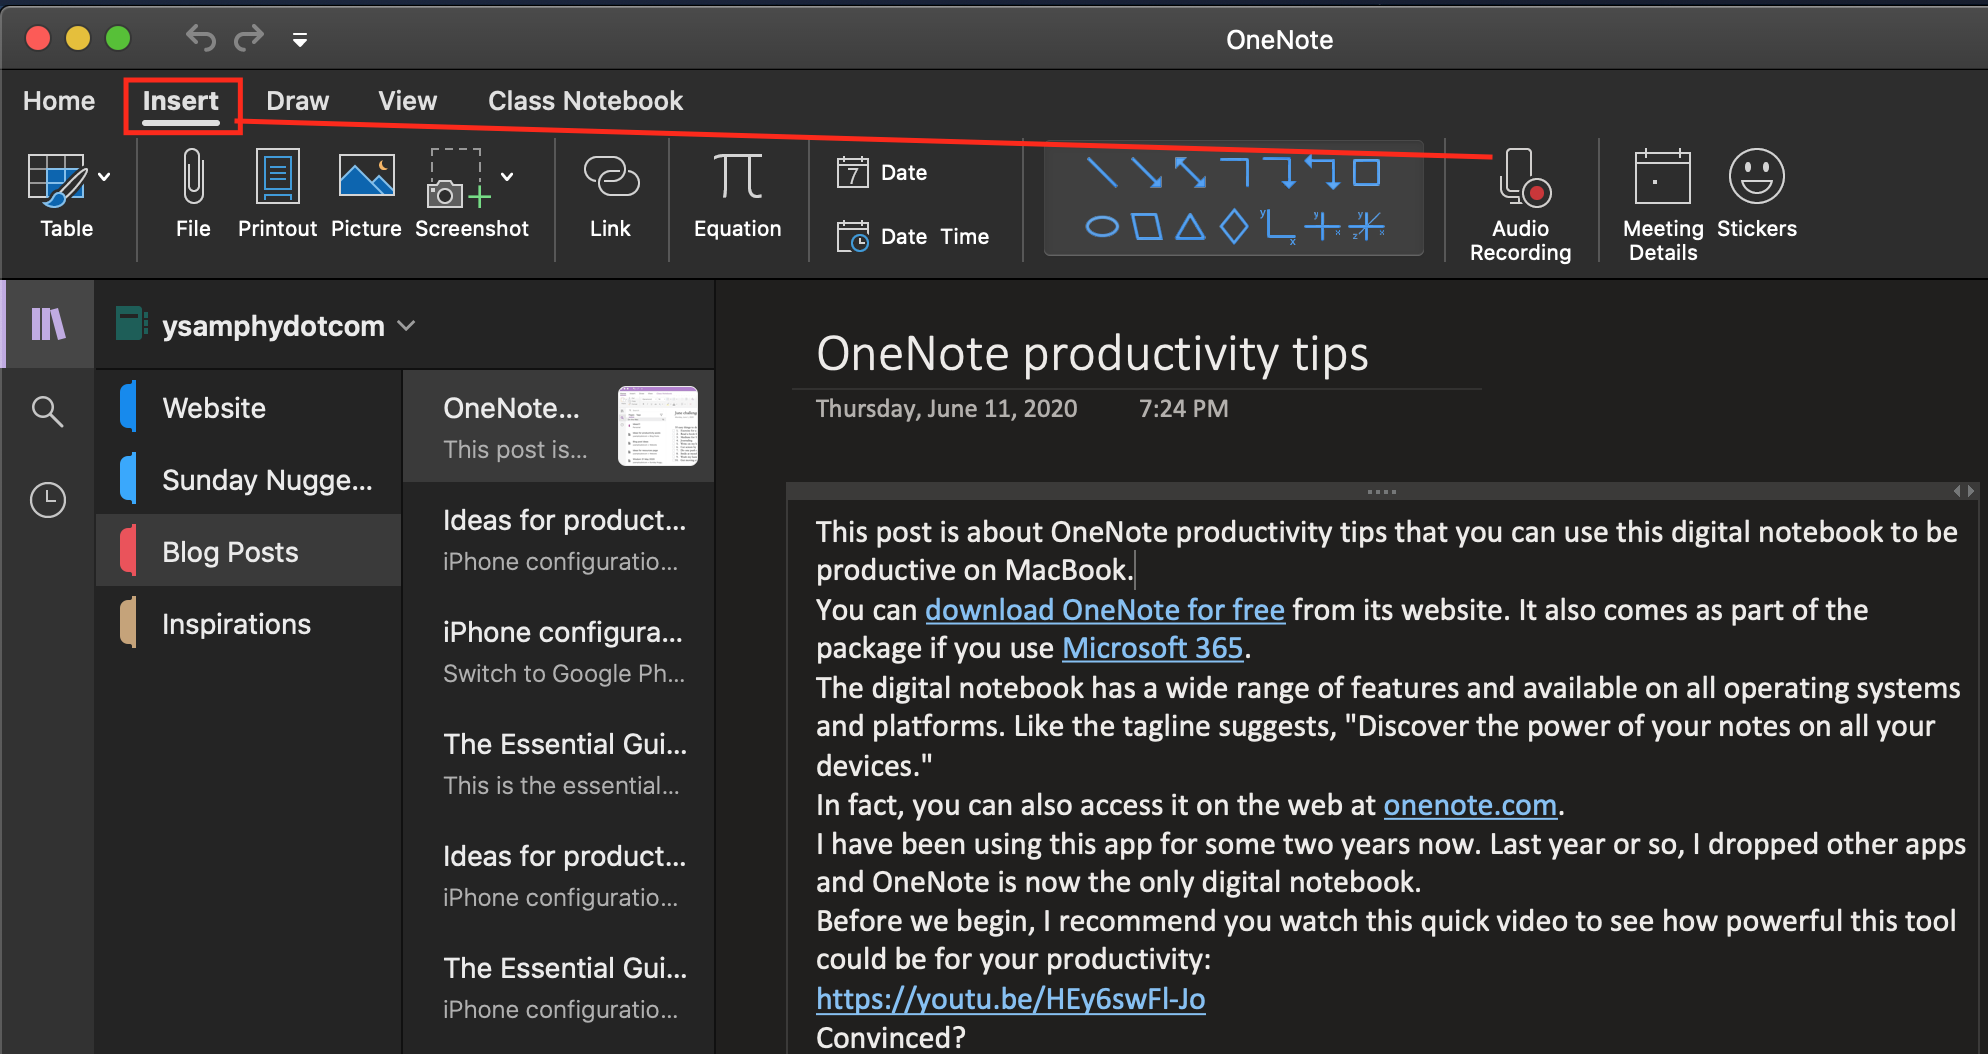
Here's how to record voice in OneNote
To stop, just click on Stop in the ribbon that appears as you do the voice recording.
You can play just by clicking Play.
Learn more about voice recording in OneNote here.
9. Password-protect your notes
Password protection in OneNote gives you the ability to keep your notes private. This is particularly good for your personal journal.
For Mac users, here are the simple steps to protect your OneNote notes with a password:
- Right-click the section you want to protect and choose Password Protection > Protect This Section.
- Type the password and confirm it by typing again in the box.
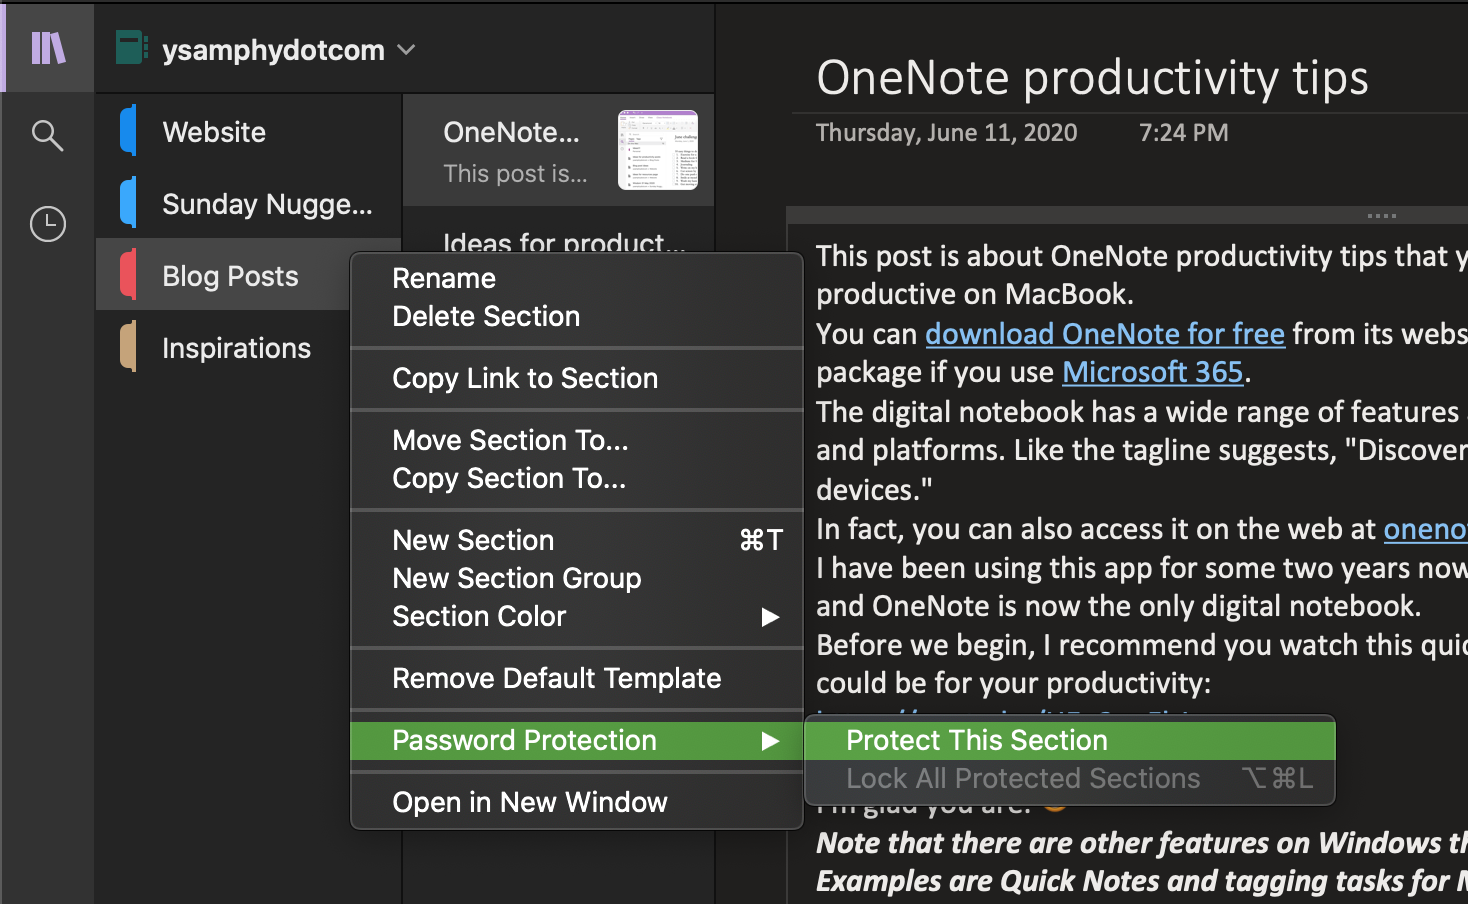
How to password protect your notes in OneNote
There are a few important things you should note about password protection on Mac.
First, you must remember the password. If you forget it, no one will be able to reset it for you, not even your IT support, (in fact, NOT even Microsoft Technical Support!).
Second, the password protection options available on Windows are not available on Mac. Even the OneNote for the Web does not have this feature available.
Third, you cannot password-protect notebooks but only sections. All the pages in the password-protected section are locked.
Fourth, password-protected sections do not appear in searches. To include a protected section in a search, you’ll have to first unlock the section.
Finally, note tags you use on any of the pages within a protected section do not appear in a note tag summary either unless the protected section is unlocked.
Team productivity should not be compromised with unsafe sharing and collaboration, after all.
10. Categorize and prioritize notes with tags
There are several tags that you can for any part of your notes to help you prioritize or categorize notes that you mark.
For example, if you are creating a to do list for your new blog project, you might want to tag as Important the line that says "Do careful keyword research before actually getting started." That will let you easily spot it.
Now, here's how you can add a tag:
- Select the text that you want to tag in your notes.
- On the Home tab, move the mouse over the Tags block, and then click the arrow that appears at the bottom of the block to expand it.
- Choose the tag that you want to use.
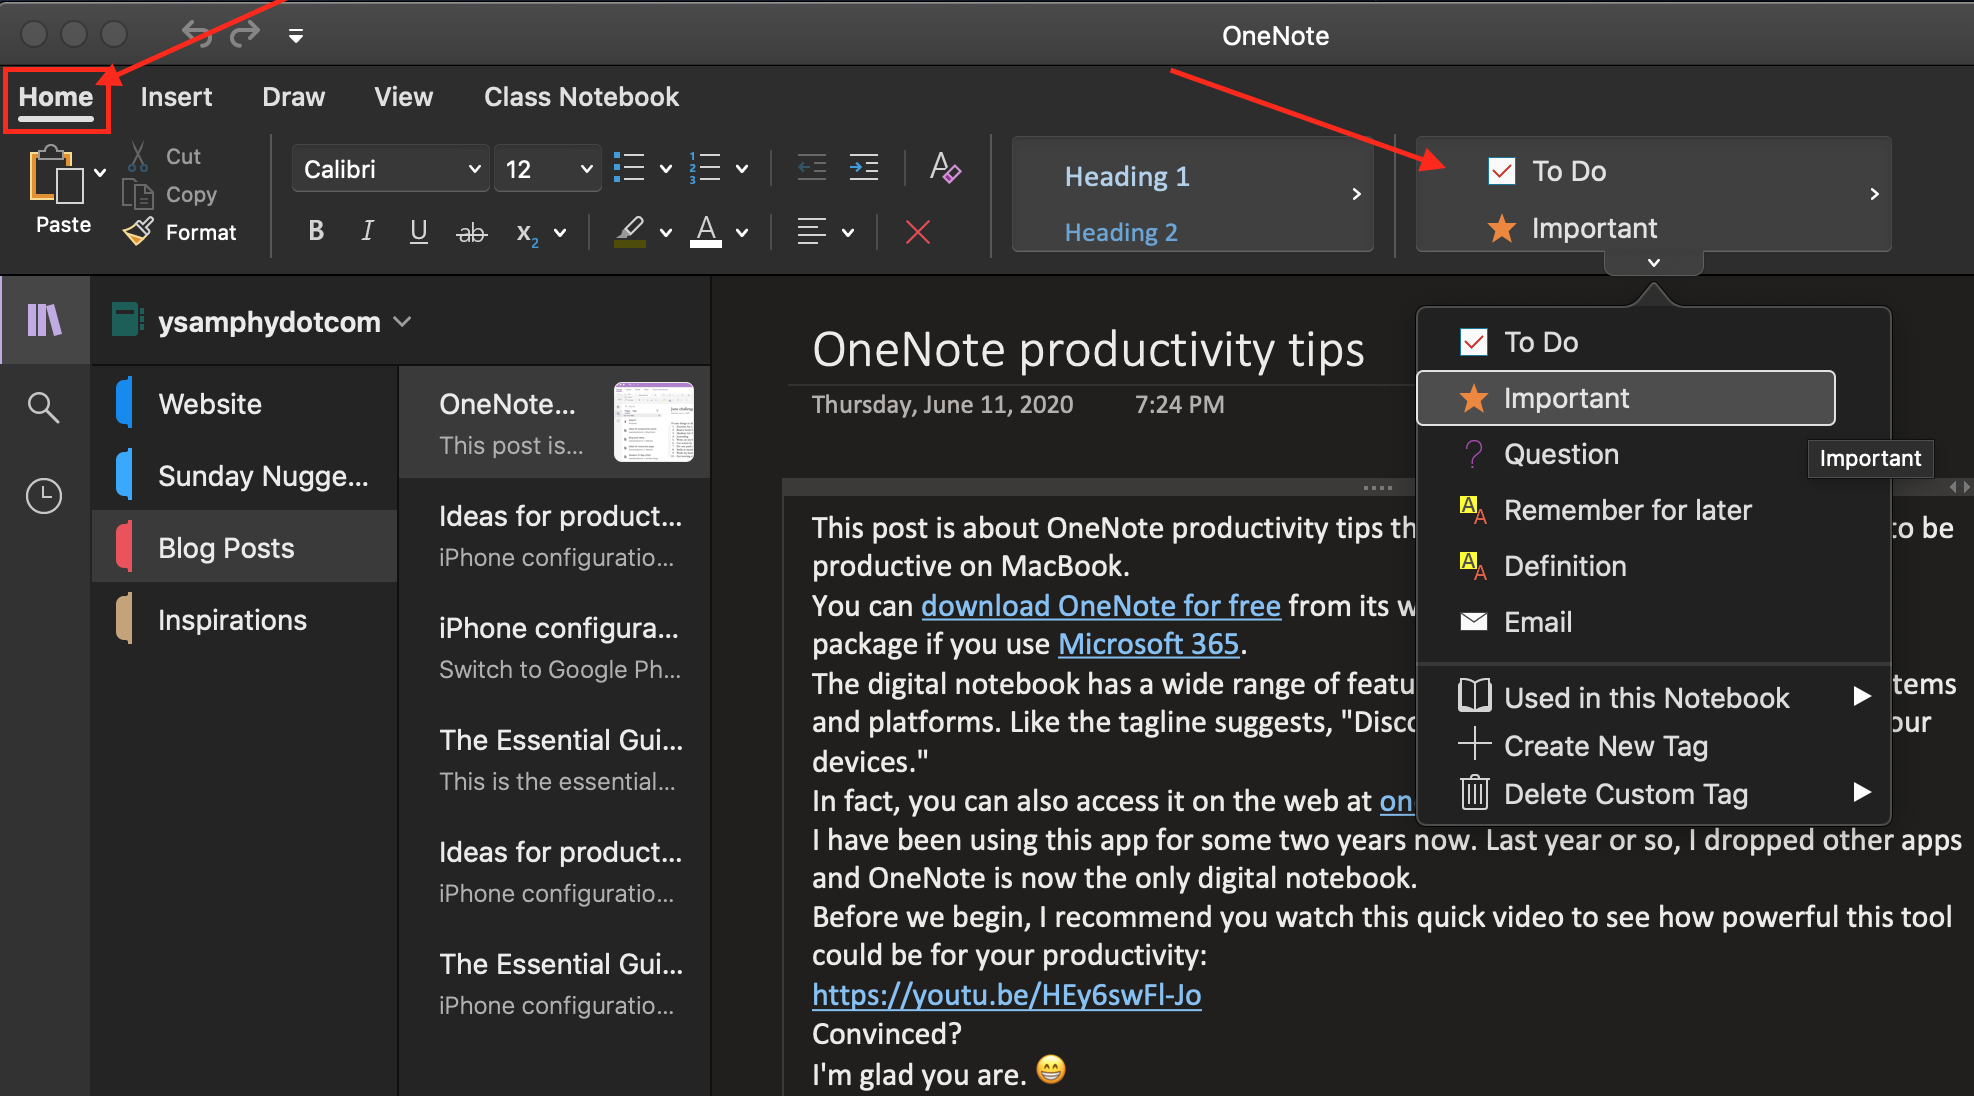
How to tag your note in OneNote
To remove a tag you've applied, just place your mouse curser after the tag and press delete on your keyboard.
From the Tags block, you can also Create New Tags and Delete Custom Tags that you've created.
11. Organize your notebooks with sections, pages and subpages
OneNote lets you organize information in notebooks with sections, pages and subpages. You can add these and also additional notebooks where and when you need them.
It is very easy to rename, move, copy, or delete them.
The hierarchical structure of OneNote is this: Notebooks > Section Groups > Sections > Pages > Subpages. The ability to copy and move your subpages, pages and sections makes it easy to organize your notes.

How to get organized with OneNote
To create a new notebook, section, section group or page on Mac, just go to File.
You can also delete them easily by right-clicking and then choosing Delete from the dropdown box. However, to delete a notebook, you will need to open OneDrive. Find the notebook you want to delete in the Document list, right-click it and then click Delete (or Press Command+delete on your keyboard).
To turn a page into a subpage, right-click any page you want to make a subpage.
Then in the dropdown box, click on Make Subpage. Note that you can not make the page on the top a subpage. Also, you can promote a subpage as a page by following the same instruction.
12. Create personal Wiki using OneNote
OneNote has deep linking structures. You can link to sections in the same notebook or across notebooks. Linking to a page is also possible. In fact, you can even link to a single word, sentence or phrase in a page.
The Wiki link syntax [[xx]] is also available in this digital notebook to make it easy to build a Wiki.
Linking to a file? That's also what you can do in OneNote.
Another great feature for a Wiki is the version history. You can view the changes and revert to any of the versions.
And the process is fairly simple if you know how the link structures in OneNote. You can find the different ways to create a link in various parts of this article.
Check out this video and you will see how easy it is:
And click here to learn what a Wiki is and what it is used for.
13. Use OneNote for book writing
It might not be the best app for book writing, but you can definitely use OneNote for book writing.
That said, OneNote could be great for taking notes and capturing ideas, or even write the first draft your book!

Here's an idea of how you can organize your book in OneNote, step by step.
- Create a new notebook for the book
- Use a section for Message from the Author, Dedication, Epigraph and Table of Contents
- Add sections for each of the chapters of your book
- Use pages to cover topics under the chapters
- if any, you can have another section for references, appendices, citations and so on
But how can you format it?, you ask.
On Windows you can easily export in as a Word document, by using the Send to Word feature. Unfortunately, as a Mac user, this option isn't available!
However, I don't think you want to use Word for book writing anyway. Scrivener would be a much greater solution.
If you do use OneNote for your first draft, then it is easy to copy and paste your text from the digital notebook to whatever book writing software that you use. And this might not take much time.
14. Use OneNote for blog writing
Using OneNote for blog writing is my favorite part of this post about OneNote productivity tips. In fact, I drafted this post in the app too.
Just simply use a page for a post.

How to use OneNote for blog writing
Here are reasons I like about using OneNote for blog writing.
Deep linking structure
What I like about this is the deep linking structure in OneNote that lets us link almost anything outside and within the notebooks, sections, page, as well as a particular word, phrase or paragraph in the page.
Accessibility
Another reason is accessibility. I can easily access my OneNote to add any ideas I might have while resting on my comfortable bed.
Deep search
The deep search is another great functionality. You can search and your notes easily in OneNote.
Easy organization
Last but not least, the organization within the app is my favorite. I have a notebook for each of my websites. Sections are for niche research notes, blog ideas (based on my keyword research), blog posts, newsletter, and inspirations.
15. Manage a project effectively in OneNote

These features in OneNote let us manage a project effectively and productively:
- Sharing & collaboration. If you work on a project with others, OneNote's sharing and collaboration tools will be handy.
- Version history control. This will be useful for the team leader to review and go back to any version of the documents you create using the digital notebook.
- Deep linking structures lets you organize and link from one note to another.
- Wiki functions in OneNote make it easy to create a Wiki page for the project.
- Search lets you find anything in your project from tasks, to pages and little notes you remember adding somewhere.
- Task tags are very useful to add the tasks for your project.
I can say that OneNote has all the basics you need for project management.
Here's how you can use OneNote to manage a project.
- Create a notebook for the project.
- Use different sections for project documents, references, task management, project wiki and so on.
- Create pages under each sections. For example, you might want to have task pages for different phases if the project have multiple phases.
Although it is not a robust system, you can do use OneNote to manage and collaborate on your project.
Greg of SharepointMaven wrote a great article about how to use OneNote for project management if you want to learn more about this.
16. Manage your day in OneNote

It is also possible to manage your tasks in this digital notebook. There are several ways to go about this.
Using a section
You might just use a single section of one of your notebooks that you use every day for task management. Just add a section called "My Daily Tasks." Then as you plan your day each day, create a page to hold your daily tasks.
Using a page
A single page to hold all your daily tasks is also possible. But you might want to use one page for only a week or month of daily tasks. Otherwise, your page will get bigger over time and could be slow to open.
Using a notebook
Another way is to use an entire notebook for this. (I'd recommend this.) If you want to go for this option, just go ahead and create a notebook called something Daily Tasks. You can use sections for monthly tasks or weekly tasks. Pages are for the actual daily task list.
You might miss out on notifications and reminders but if you stick to it and review it every day before you leave work, you can definitely use OneNote to manage your day.
If you want a robust task management app, I'd recommend Todoist. I use it myself and love how simple yet sophisticated it can be to let you conquer your day.
17. Organize your notes with "Sections Group": OneNote productivity tip you use if you have a large notebook
The latest version of OneNote comes with the ability to group sections together. This is useful if you have too many sections for a notebook. The Section Group can also be the easiest way to manage a large number of sections if you have only one notebook for everything.
Or sometimes, it's just necessary to have more than three hierarchical levels for your notebook. Then "Section Group" will come in handy!
To create a Section Group on Mac, right-click anywhere in section tab, and then click New Section Group.
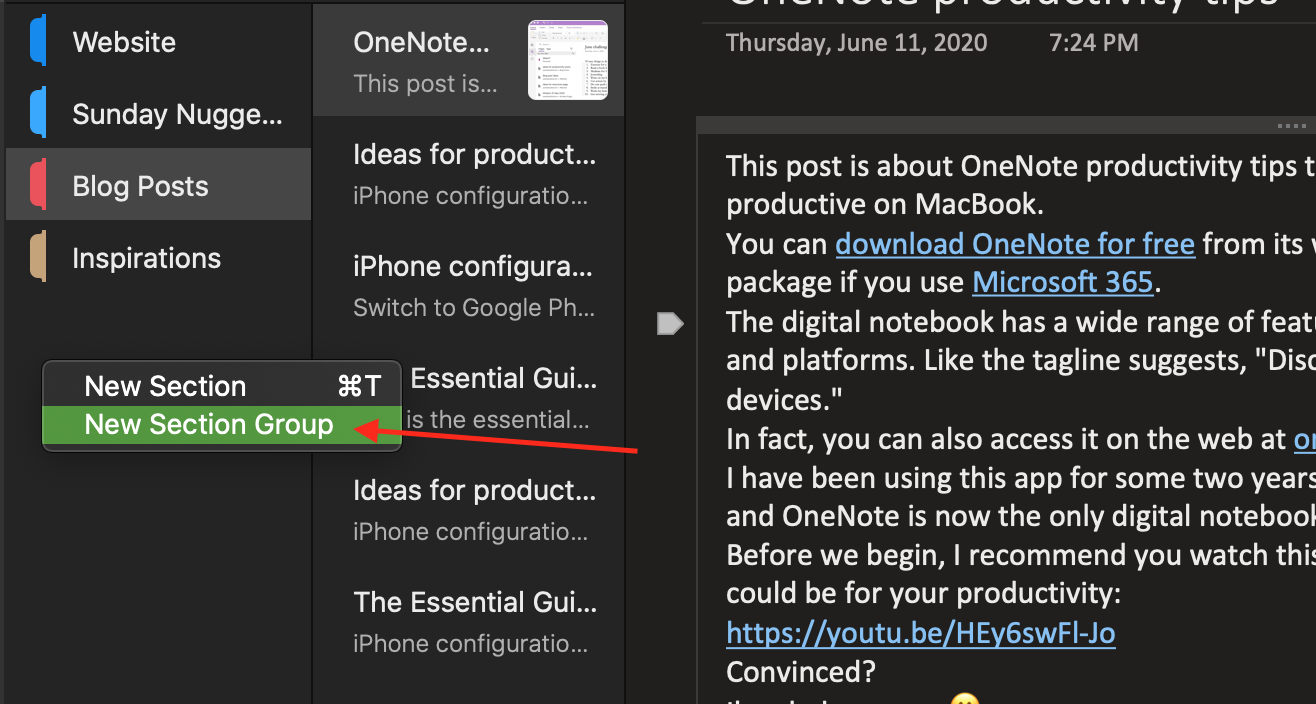
To add sections to a the Section Group, just drag their section tabs over the section group icon.
18. Capture your screen with OneNote
Have you wanted to take a screenshot for your note? You don't need a separate software program to do it.
OneNote makes it very easy to add screen clippings to your note on Mac. Go to Insert > Screenshot.
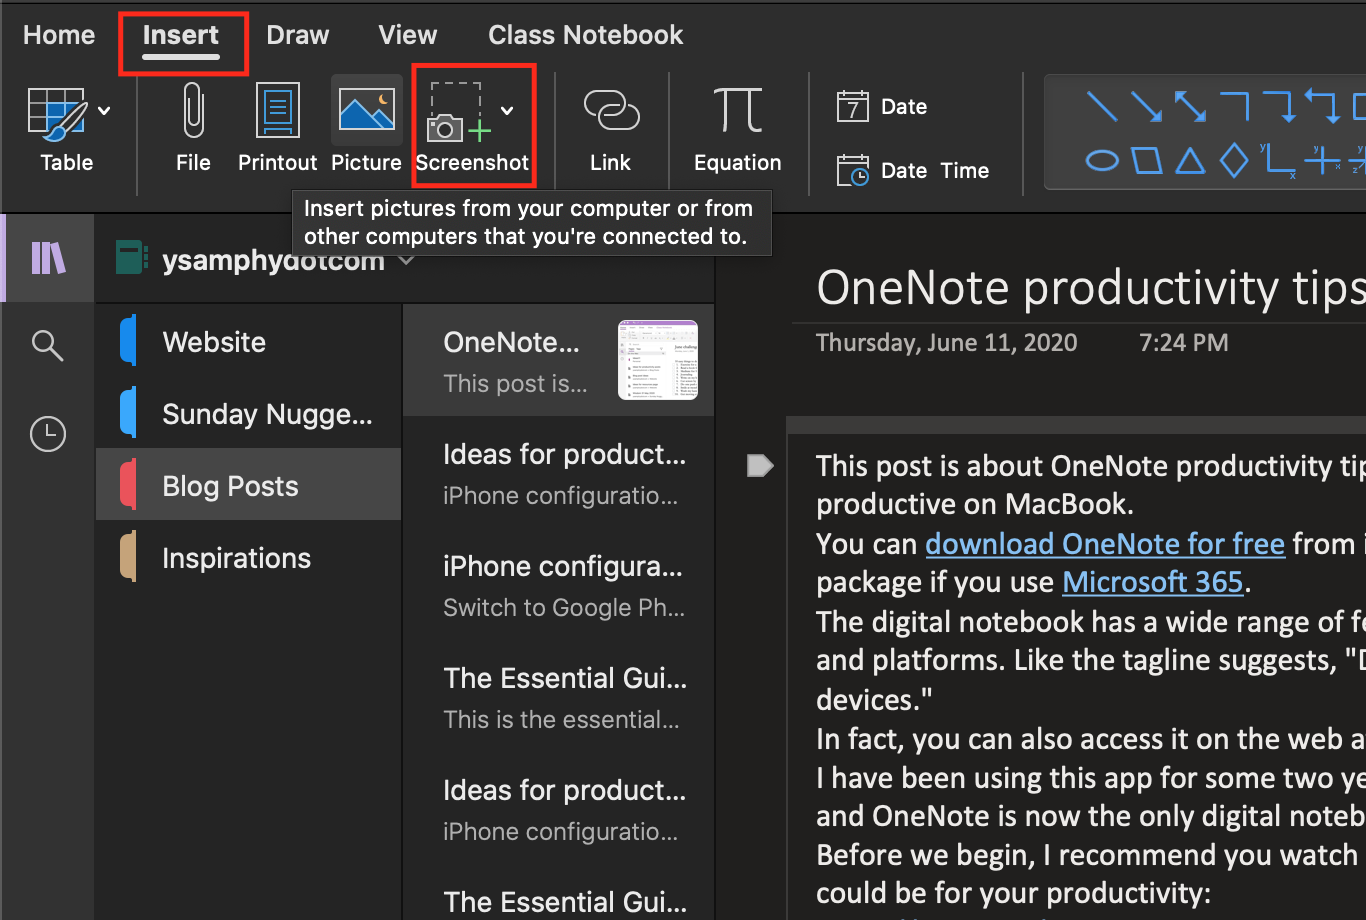
How to capture screen in OneNote
When you click on Screenshot, a box appears showing all your actives screens on your Mac. To add a certain screen, just click on it. Then OneNote will add that into your note just right next to your mouse cursor.
To manually select which screen and what part to capture, select Screen Clipping at the bottom of the box.
19. Clip anything on the web to OneNote in only a click
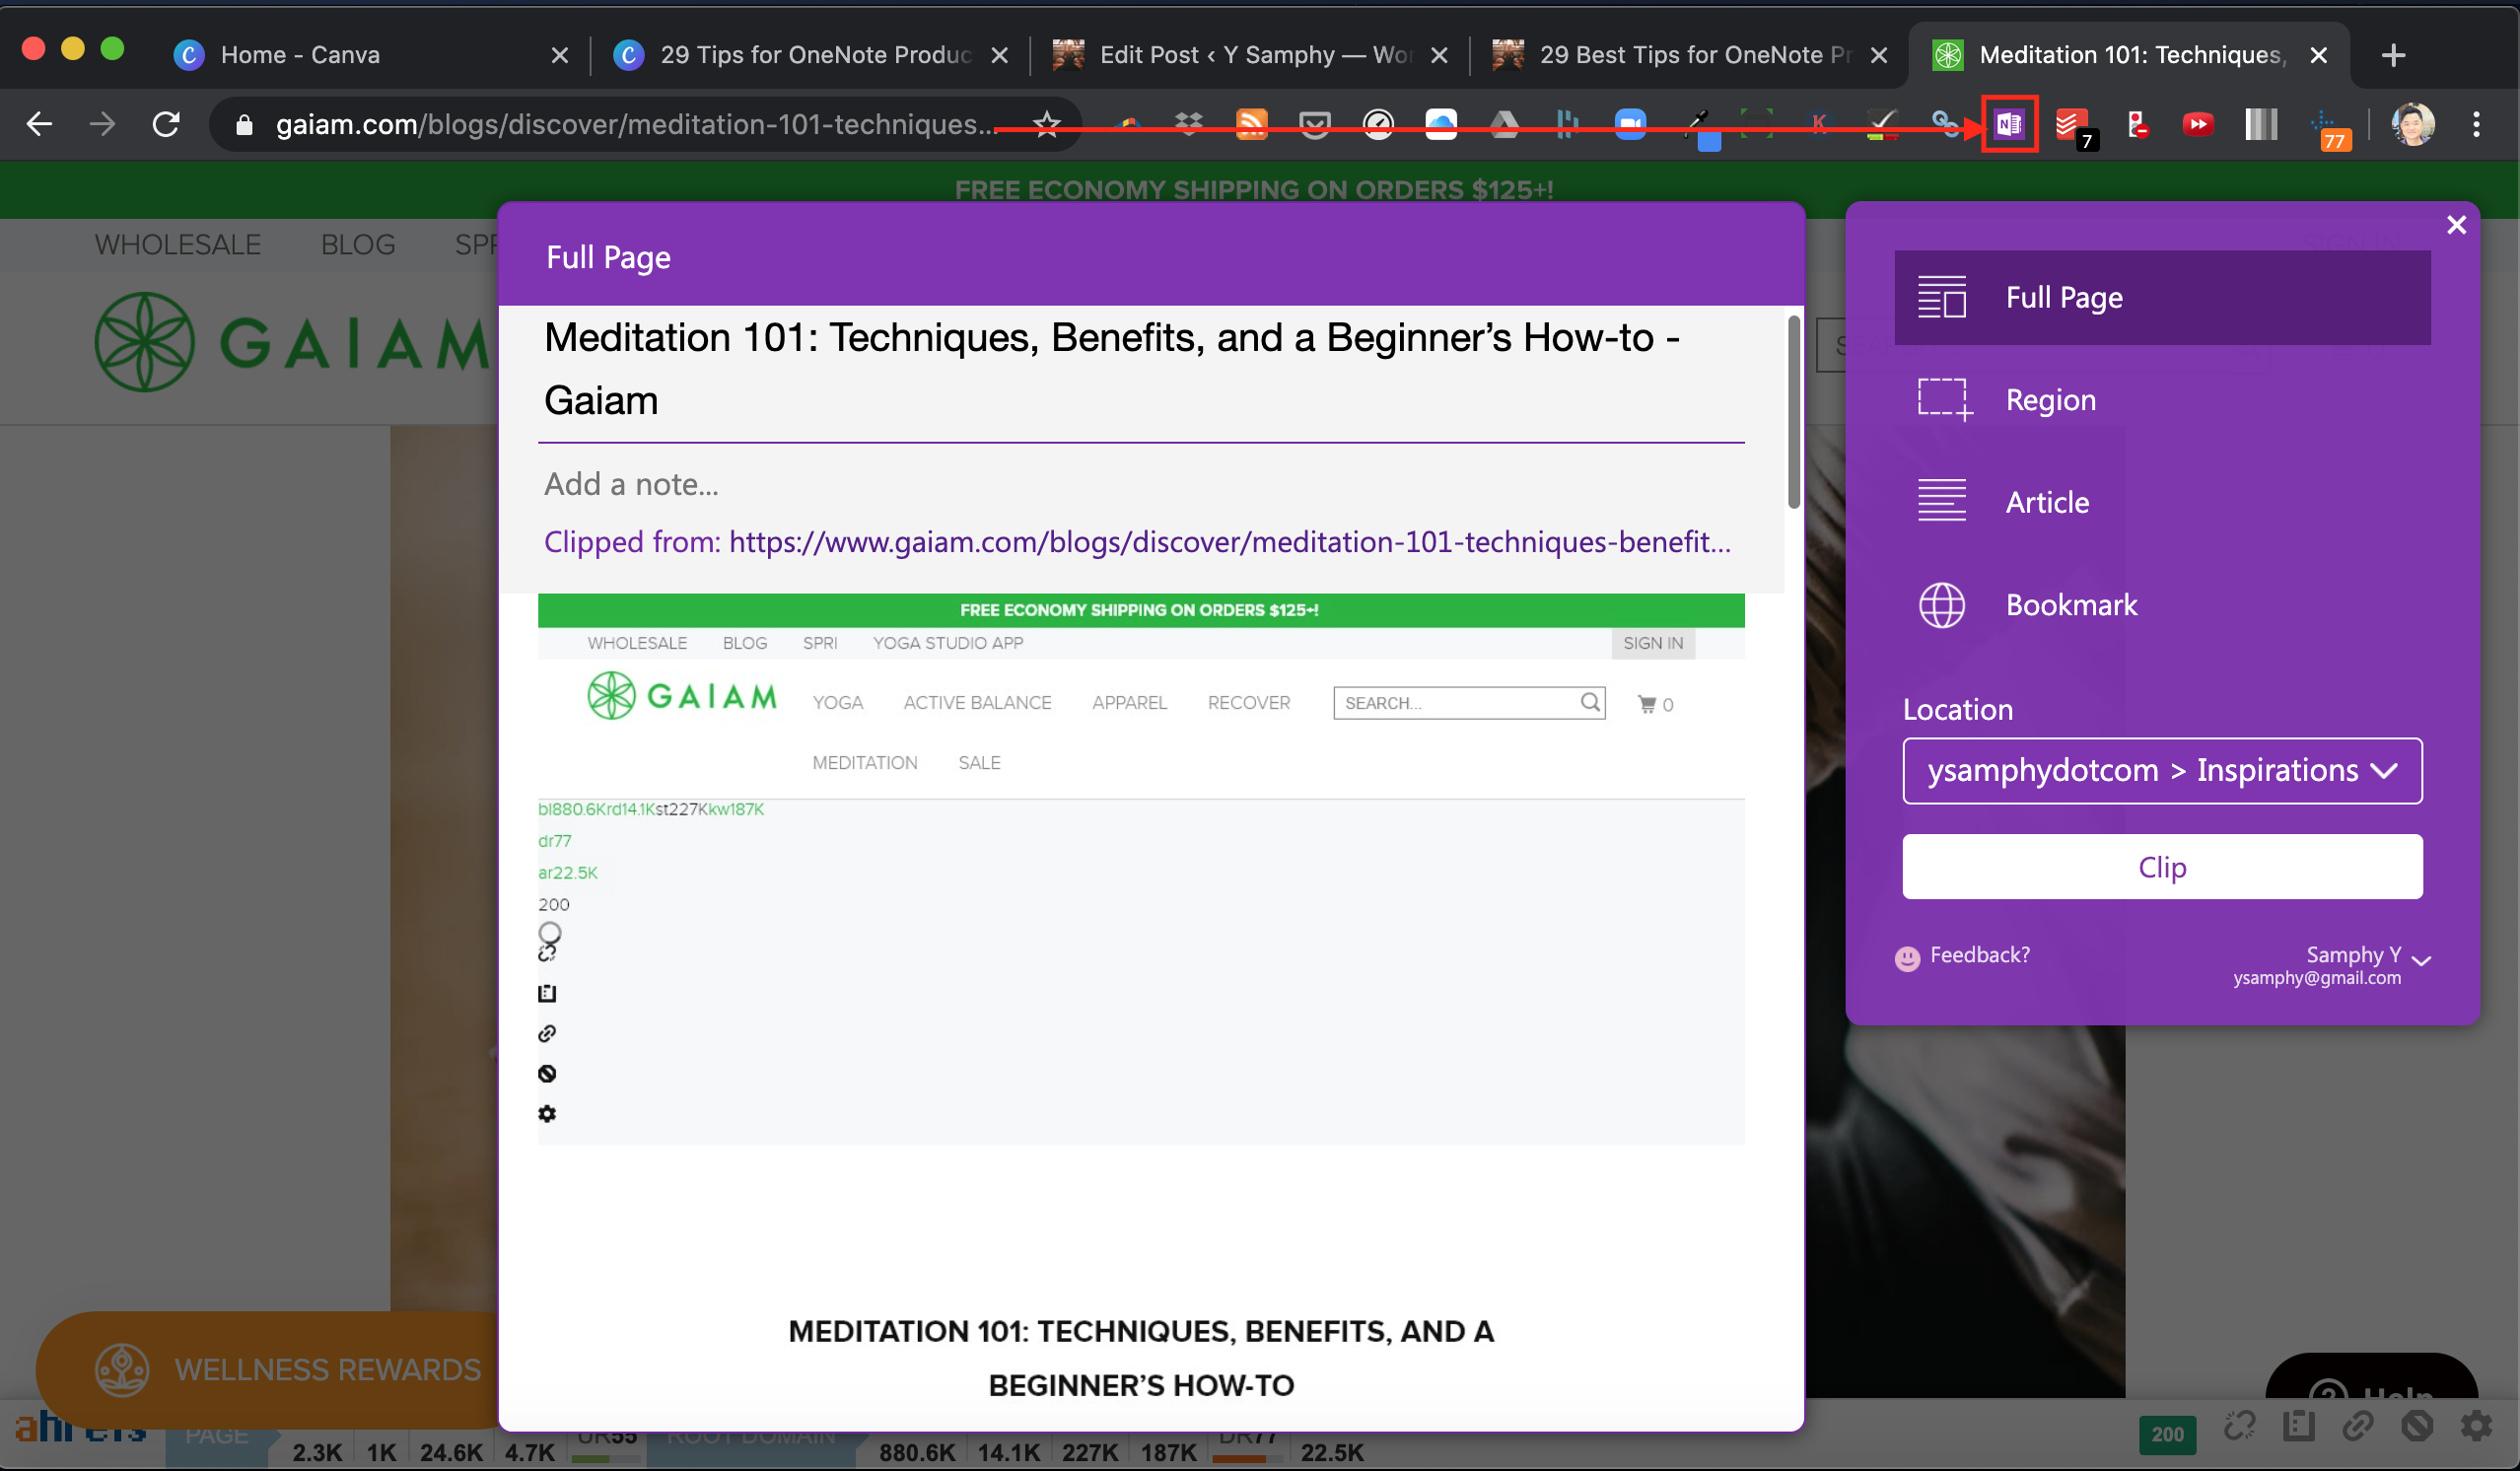
Clip anything on the internet with OneNote web clipper
OneNote comes with a Web Clipper to allow us to easily clip anything on the internet. Click here to install the OneNote Web Clipper.
The Web Clipper lets you quickly clip all or part of a web page, and save it for later. You can also clip images, pdfs, videos, or a visual bookmark of a page.
I use it a lot for my research on productivity. But it is also great for reading, news and inspirations.
As your notes sync every where on your devices, your web clips are accessible every where, even when you're offline!
20. Attach documents to easily find it later
Inserting information from other sources is a great way to save time. Instead of retyping information, you can bring the content you need directly into OneNote as an attachment.
Follow these steps to attach a file on Mac.
- Click anywhere on the OneNote page where you want to insert a file.
- Click Insert > File.
- In the dialog box that appears, choose the file you want to attach, and then click Open.
- You then are prompted for three options: 1) Upload to OneDrive and insert link, 2) Insert as attachment, and 3) Insert as printout.
- click Insert as attachment.
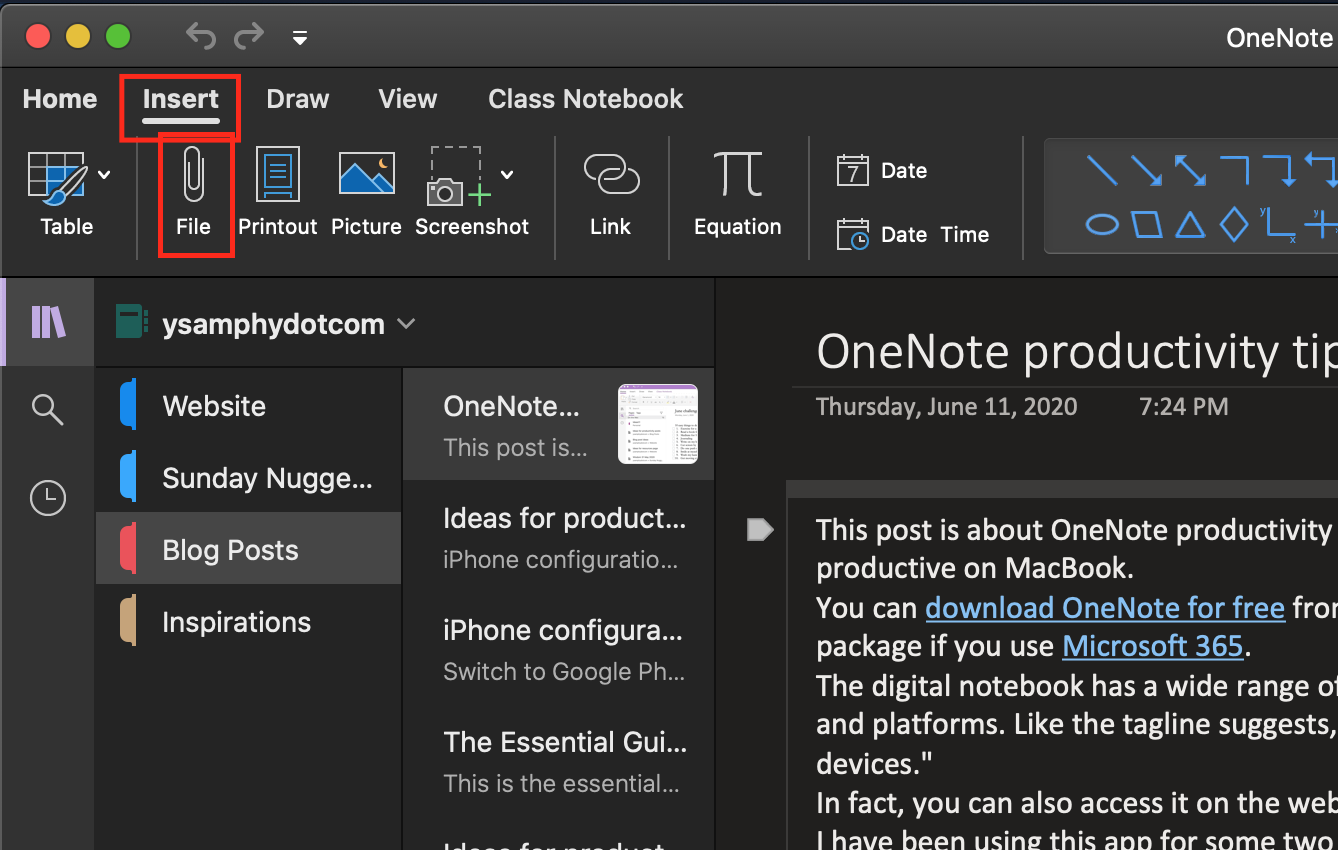
How to attach files into OneNote
Then you should see an icon which you can click to open the file you've just attached.
Note that attached files are as part of their associated notebook. So if you move a notebook to another location, any inserted files move with it.
21. Insert a file as a printout
Inserting a file as a printout turns the file into a picture or multiple pictures depending on the number of pages the file has. You can resize them and move them anywhere on the page. You can add notes or annotations to the image.
Also, OneNote adds a file as an attachment in both the original file extension. It also converts the file into a PDF.
Follow the following steps to insert a file as a printout:
- Select anywhere on the OneNote page where you want to insert a file printout.
- Choose Insert > Printout.
- In the dialog box that appears, click the file you want to insert, and then select Insert.
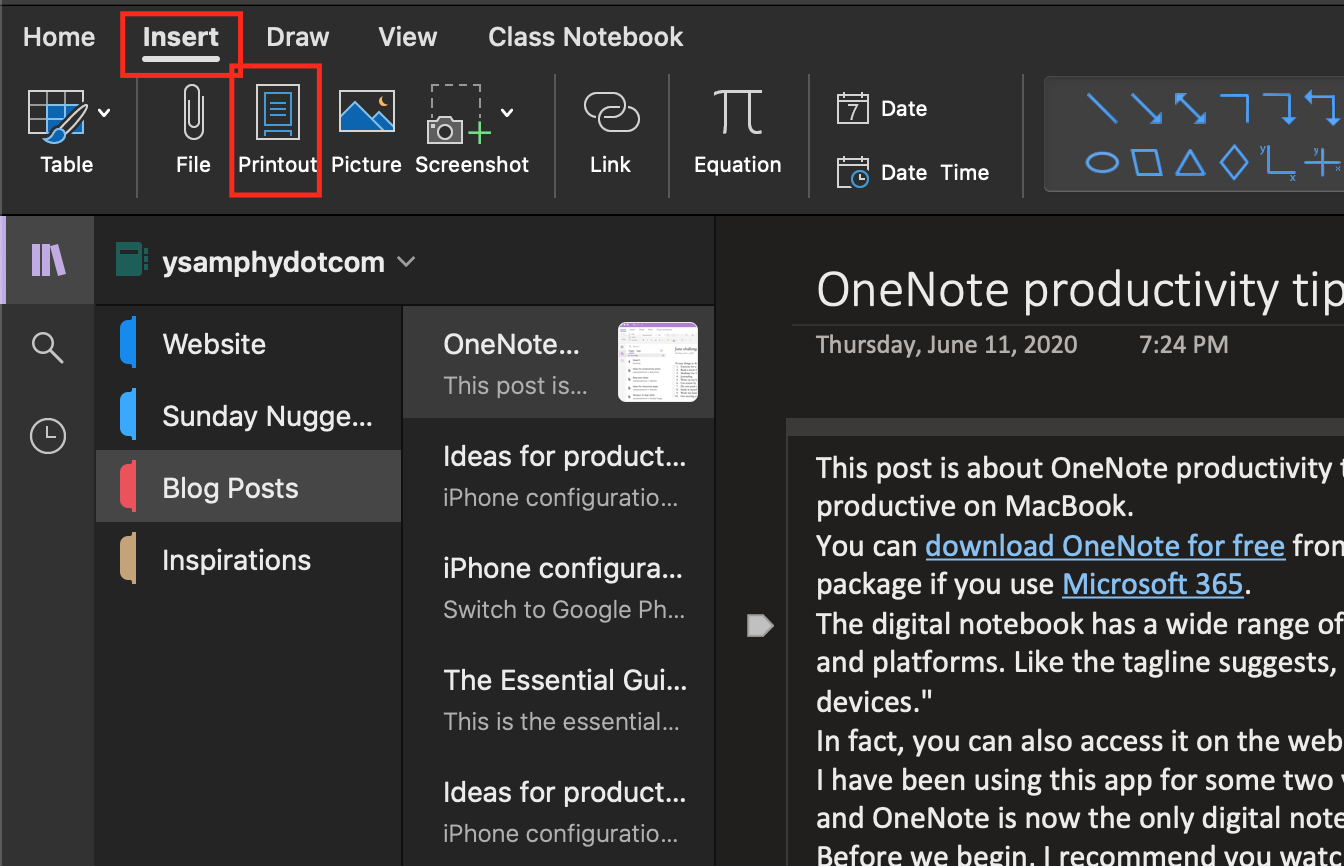
How to add a printout in OneNote
Note that if you want to insert a password-protected document, you’ll need to enter the correct password.
22. Send your page as an Email message
If you like working in OneNote so much you even draft your email there, you can now send your note page as an email message. Just follow these simple steps for Mac users:
- Create a page in a notebook and write your email there
- When you're done, choose File from the menu bar
- Towards the bottom of the dropdown menu, hover your mouse cursor over Share
- Towards the bottom of the box that appears, click on Send Page as Email Message.
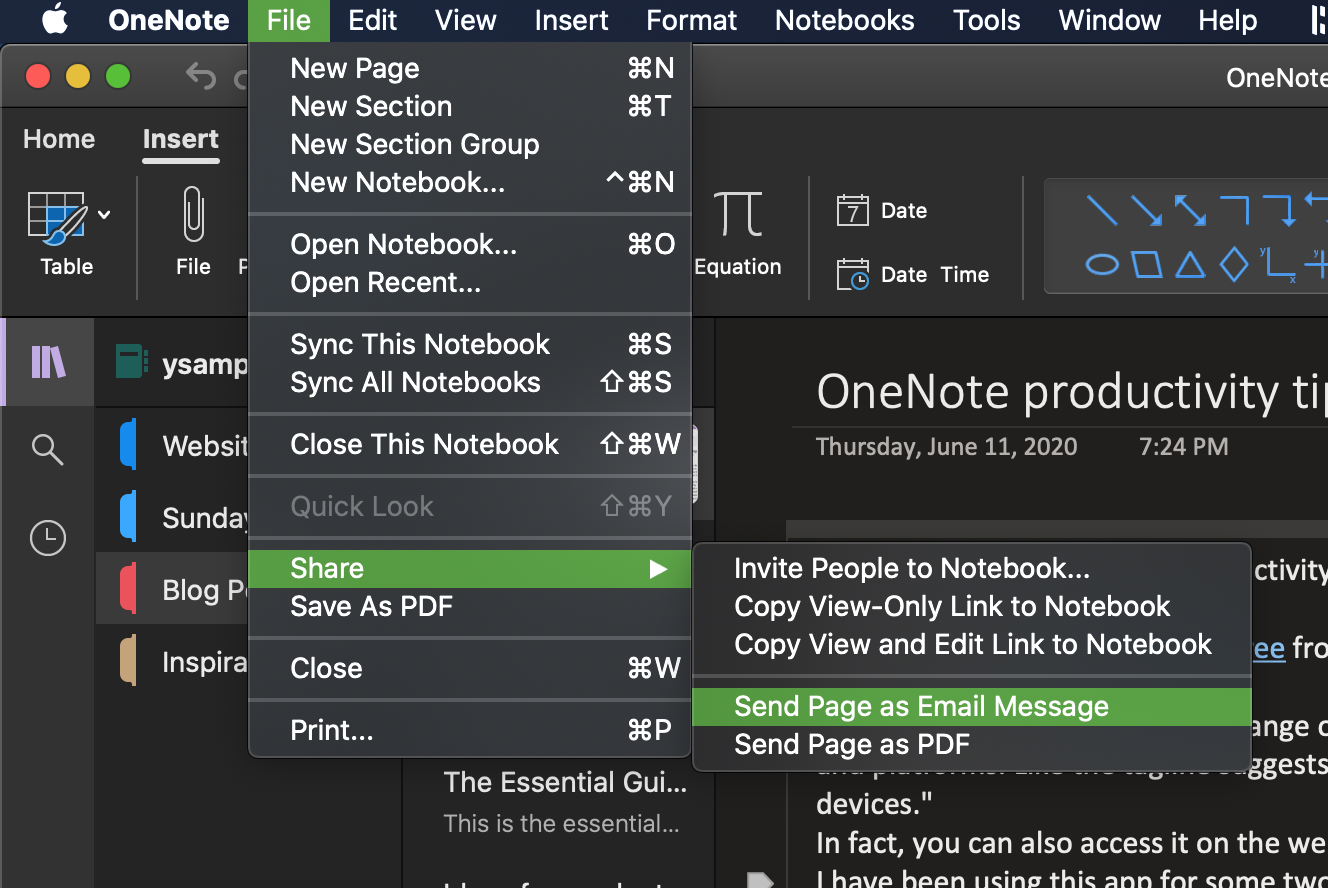
How to send page as email in OneNote
OneNote opens Microsoft Outlook (or your default email program if you don't have Microsoft Outlook installed) with your note in the body of your email message.
Drafting email in OneNote is good if you like the powerful search that this digital notebook has to offer. In fact, it can somehow boost your email productivity.
23. Learn these keyboard shortcuts to boost your OneNote productivity
Keyboard shortcuts allow you to quickly complete commands and functions without using a mouse. The more you know know the shortcuts, the more time you should able to save working in this digital notebook app.

OneNote keyboard shortcuts for better productivity
Here is a list of the keyboard shortcuts for OneNote for Mac that you should know to increase your productivity.
- Create a new page –– command + n
- Insert an emoji –– control + command + space bar
- Open notebooks –– command + o
- Close a notebook –– command + shift + w
- Indent a paragraph –– command + ]
- Outdent a paragraph –– command + [
- Zoom in –– command + +
- Zoom out –– command + -
- Select all elements and items in a page –– command + a
- Select the page title –– command + shift + t
- Cut the selected text or item –– command + x
- Copy the selected text or item –– command + c
- Paste content –– command + v
- Undo –– command + z
- Redo –– command + y
- Begin a bullet list –– Type an asterisk ( * ) and then press the Spacebar
- Begin a numbered list –– command + /
- Insert a current date –– command + d
- Insert current date and time –– command + shift + d
- Insert an equation –– control + = (It doesn't do calculation for us on Mac)
- Search on page –– command + f
- Search all notebooks –– command + option + f
- Switch between sections –– command + shift + { or }
- Switch between pages –– put a cursor in a page, press command + control + g, and then press the up or down arrow key
There are many other shortcuts that you can find and use. Click here to learn more.
24. Embed content from different websites and sources
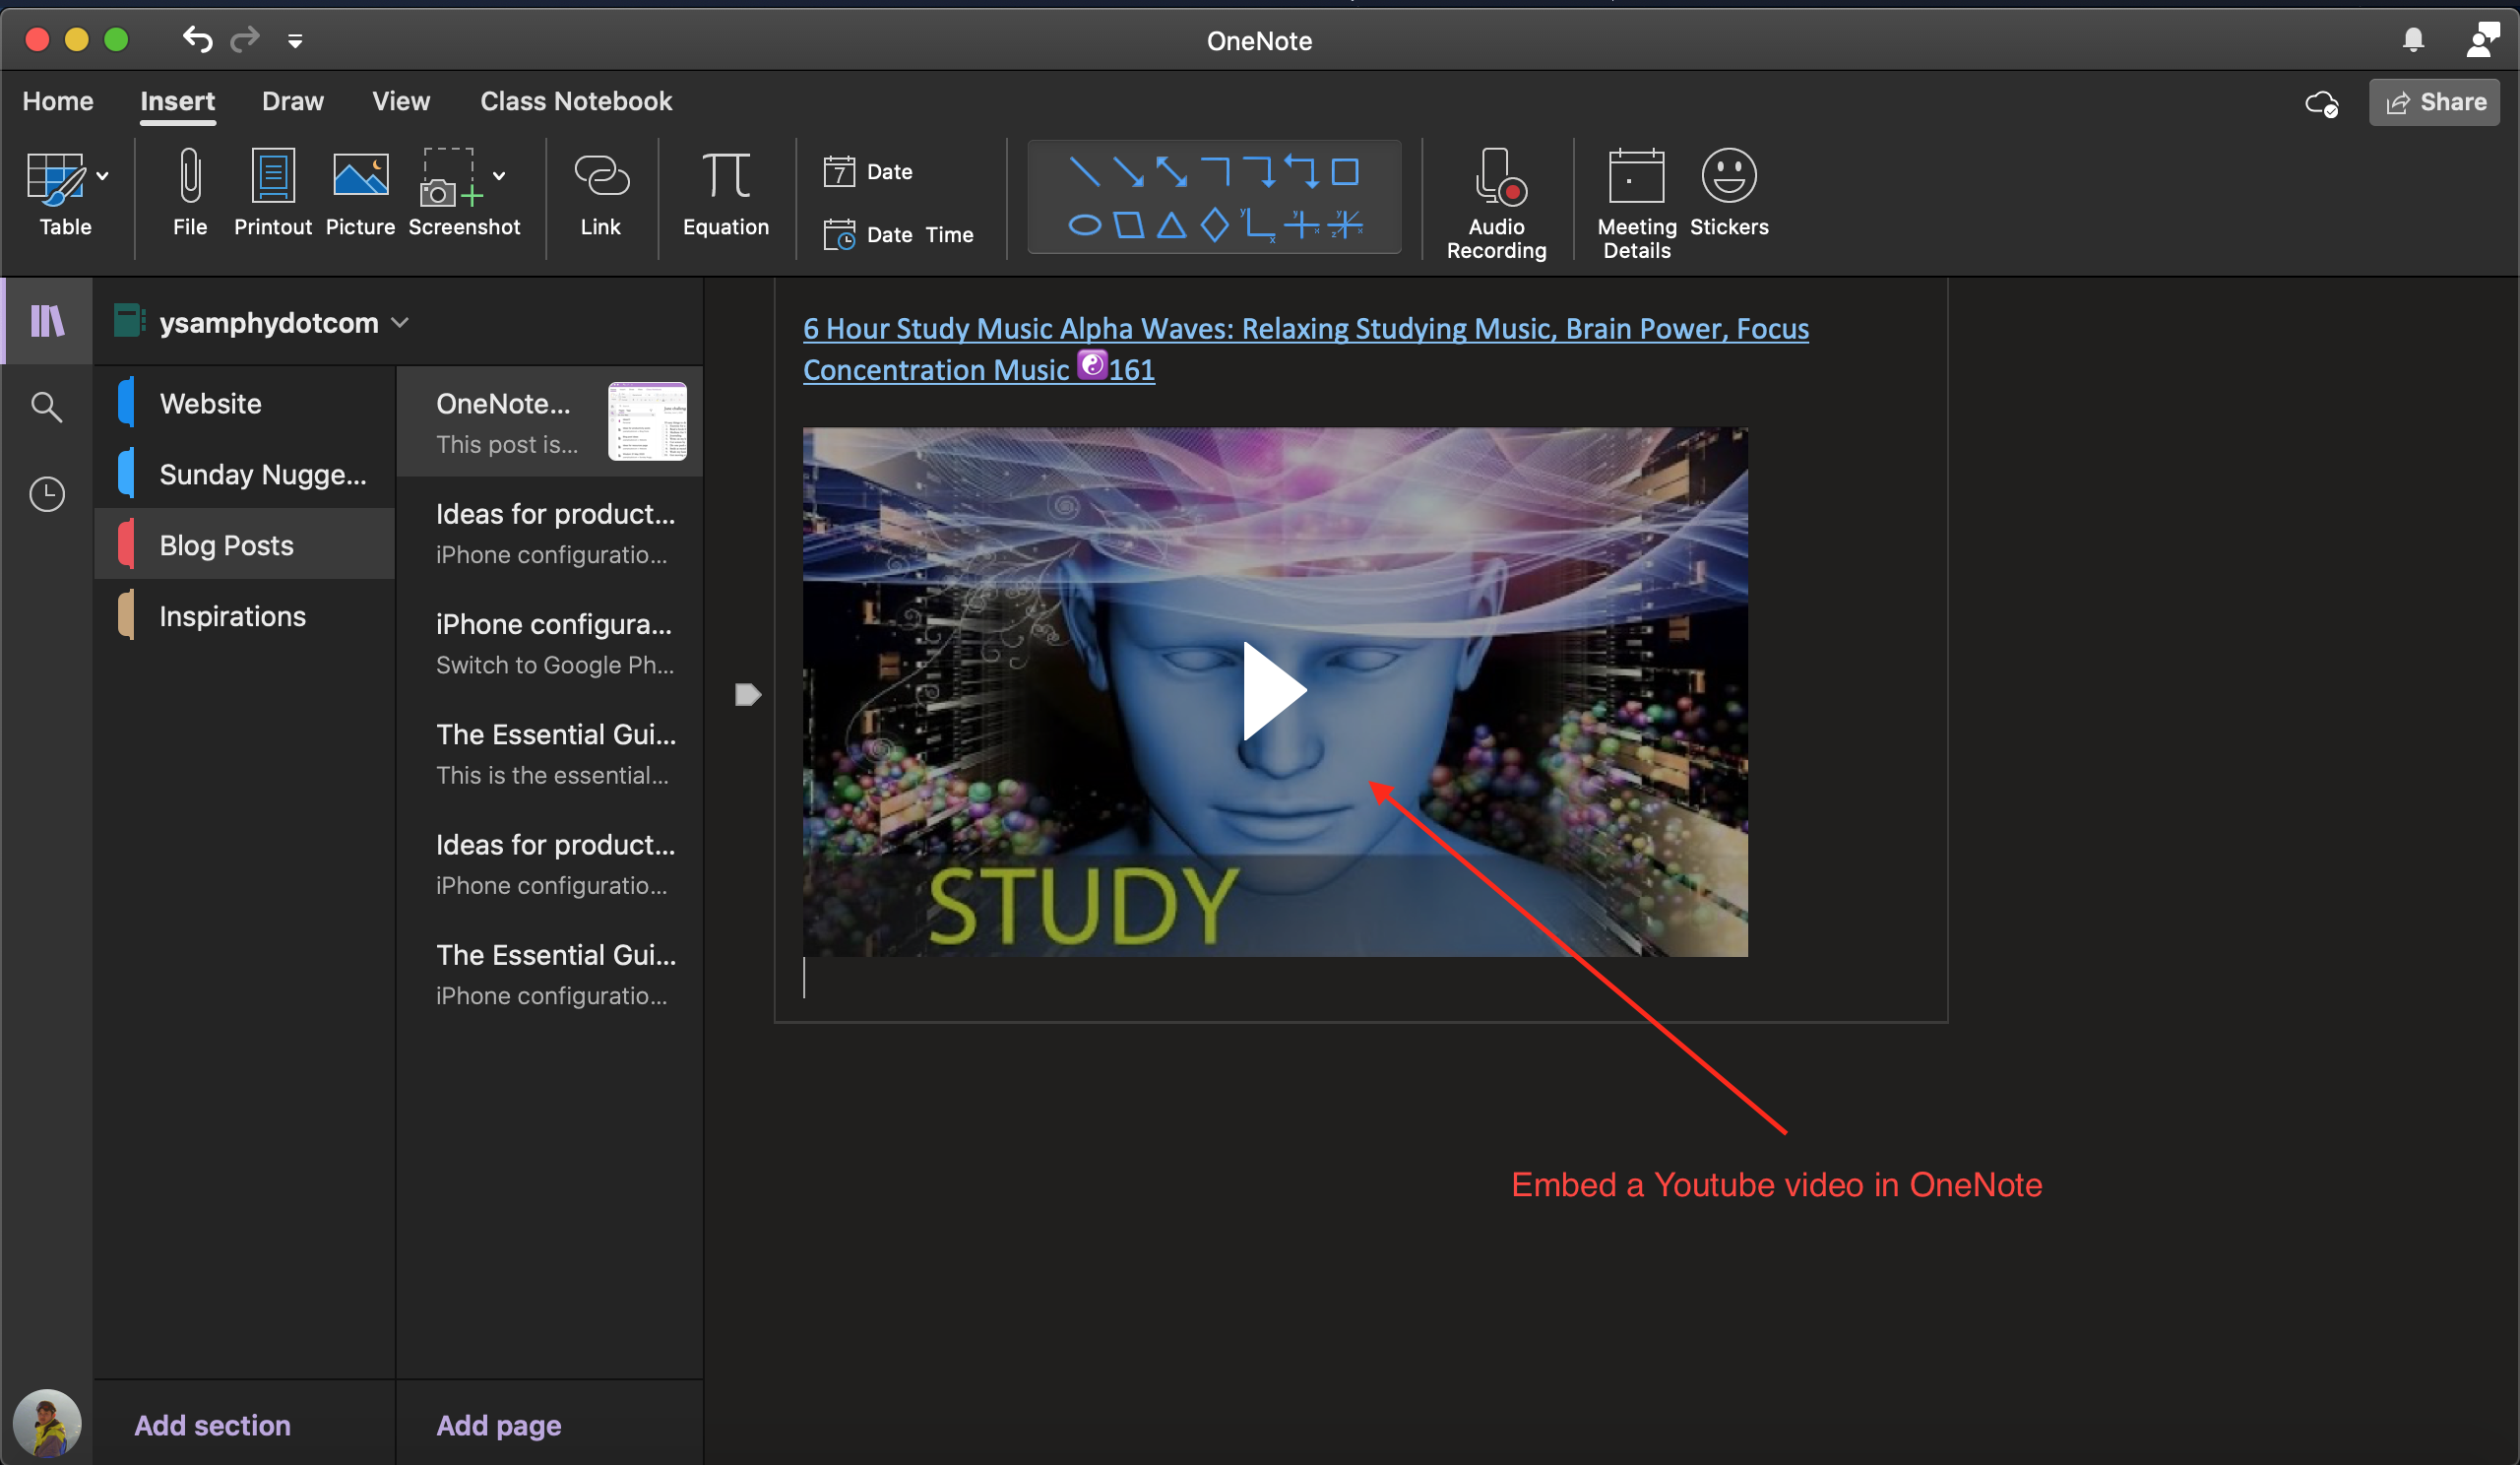
OneNote allows us to easily embed a wide variety of content from the following sources into OneNote such as documents, videos and audio clips:
- Buncee
- ClickView
- Coogle.it
- Creaza
- DailyMotion
- Desmos
- EdPuzzle
- Flat.io
- Flipgrid
- Genially
- Geogebra
- Giphy
- Microsoft Forms
- Microsoft Stream (Windows only)
- nanoo.tv
- Office files on OneDrive
- PhET Interactive Simulations
- Power BI (public, non-authenticated URL)
- Quizlet
- Planet eStream
- PlayPosit
- Repl.it
- Screencast.com
- Sketchfab
- Slideshare
- SoundCloud
- Spotify
- Sway
- TED Talks
- ThingLink
- Vimeo
- Wakelet
- Wizer
- YouTube
Just insert, paste, or link to such content right in your notes.
25. Insert and format a table in your notes
We don't usually need to include tables in notes but there are times we do need them. OneNote for Mac allows you to insert and format tables easily.
You can resize the rows and columns the way you can in Word. In fact you can even sort it alphabetically.
There are three ways you can insert a table in OnoNote for Mac.
- Click the Insert tab, and then click the Table button. This method of creating a table lets you choose the number of rows and columns you want for a table.
- Go to the Insert menu on the menu bar, choose Table. This inserts a table with four rows and four columns. You can add or remove them later as you customize your table.
- The third way is little known! Just press Tab on your keyboard as you type a text in your page. This creates a table with two rows. You can keep adding more rows by typing the Tab button.
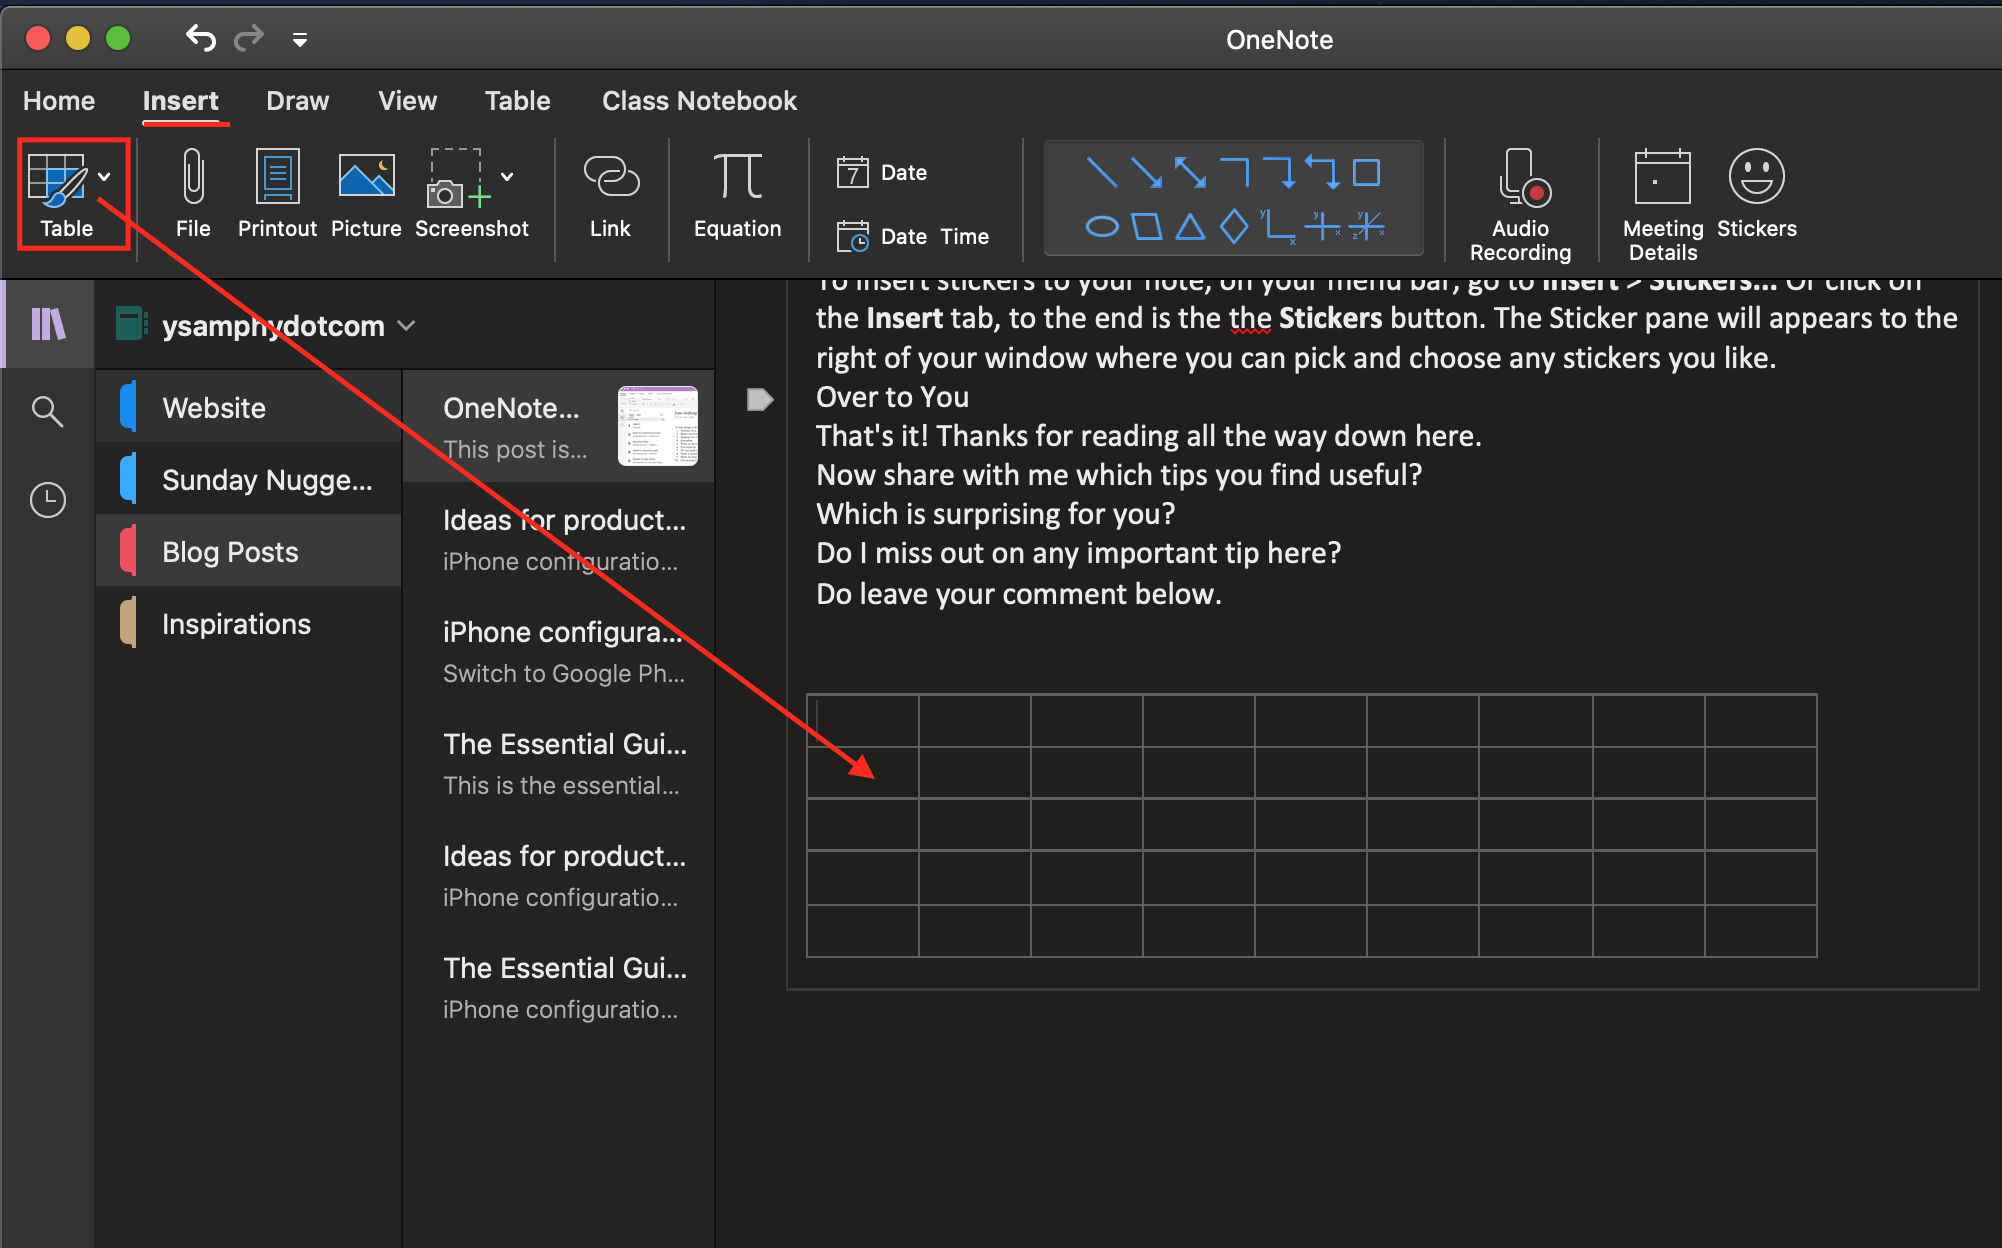
How to add a table in OneNote
To modify your table, just put your cursor any where in the table and then click on the Table tab that appears. Or you can just right-click it.
Here's what you can do with your table in OneNote:
- Add and remove columns and rows
- Delete rows, columns and the table entirely
- Hide borders (This hides all borders in your table. There's no option to hide just certain parts.)
- Shade columns with colors
- Sort the table alphabetically
26. Use Immersive Reader for improved reading experience
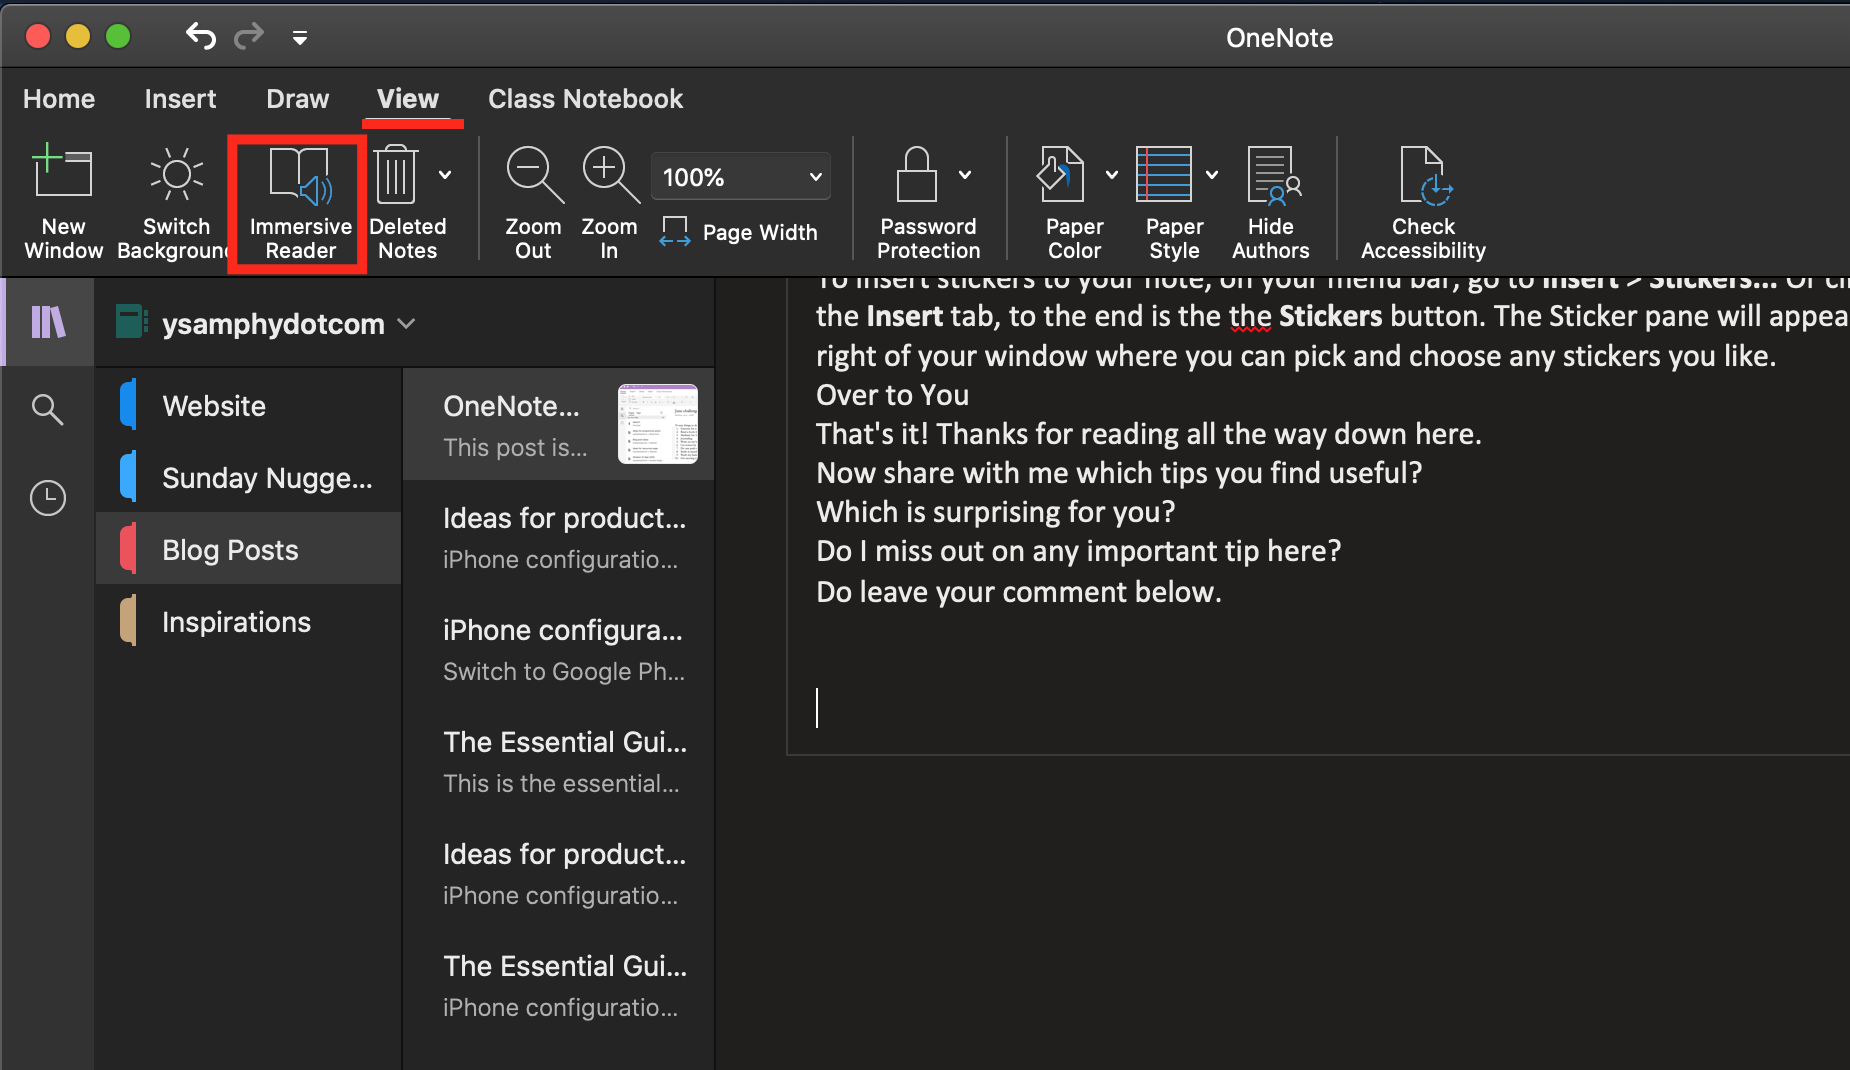
How to use Immersive Reader in OneNote
The Immersive Reader is a full screen reading tool to improve readability of content. You can use it make reading your OneNote notes more friendly.
Just click on the View tab (or Tool in the menu bar!). Then click Immersive Reader. It takes a few seconds to prepare the reader.
This tool also allows you to listen to your note!
In fact, there are loads of customizations you can make. Read here to learn more.
27. Save notes as PDF
If you want to share your notes without giving someone access to all of other notes in your OneNote notebooks, you can export any page in your notebook as a PDF file.
You'll need this mostly if the person you want to share the note with does not have OneNote or if you don't want them to see your entire notebook. Otherwise, you can just share a link to your note.
Follow these steps:
- In OneNote for Mac, go to the page you want to save.
- On the File menu, click Save As PDF.
- Choose where you want to save the file.
- Click Save.
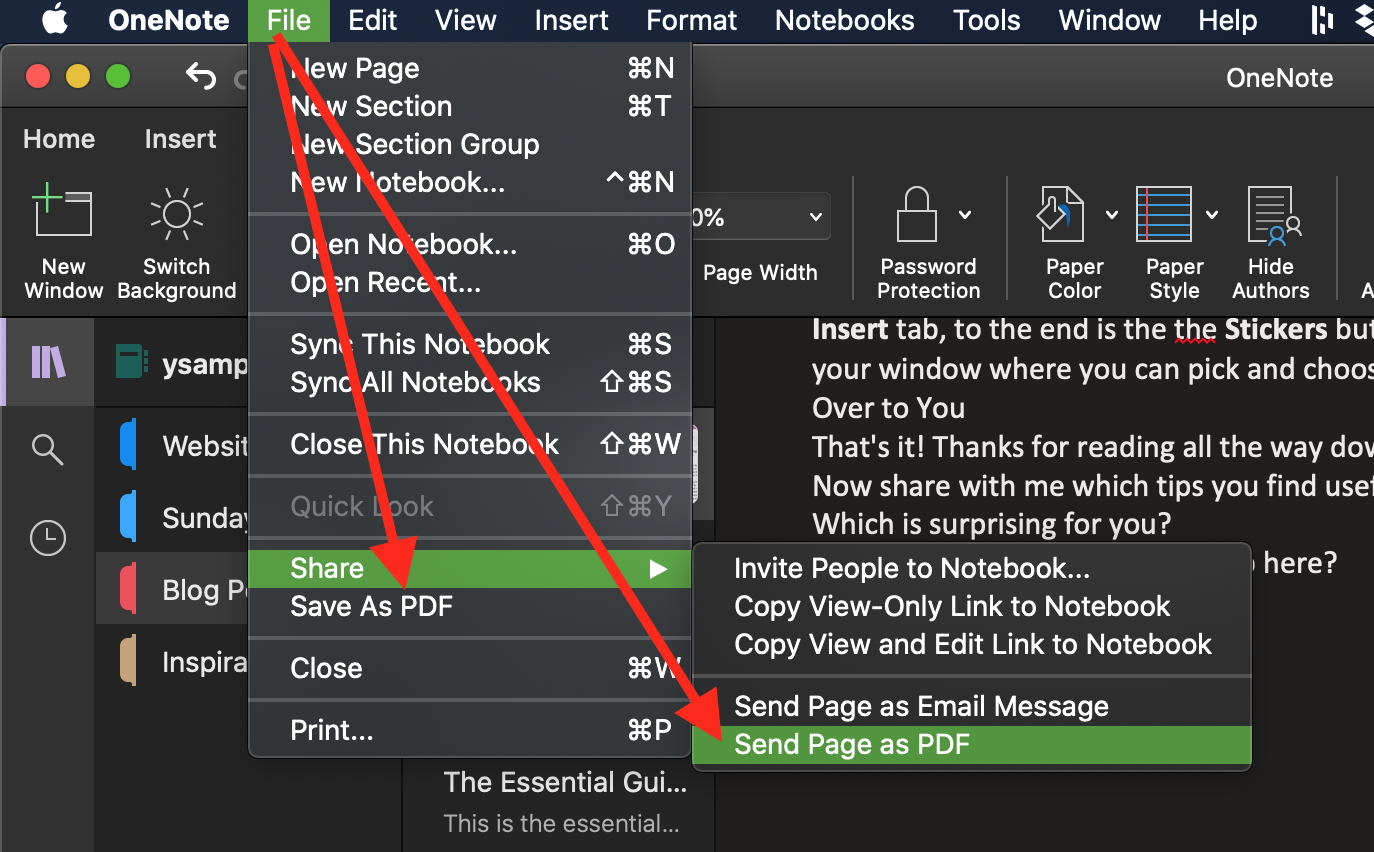
How to save a page as PDF in OneNote
Note: Currently, the PDF file exported from OneNote for Mac is clumsy and you can't resize the page size the way you can for Windows users!!! I tried resizing the text box. It worked but still the title block didn't change and was cut off when exported!
28. Turn on Dark Mode to make it easy on the eye
Dark Mode can improve readability in low light environment. To configure your Mac and OneNote for Dark Mode, do the following:
- On the Apple menu, click System Preferences.
- In the System Preferences dialog box, click General.
- Under Appearance, click Dark.
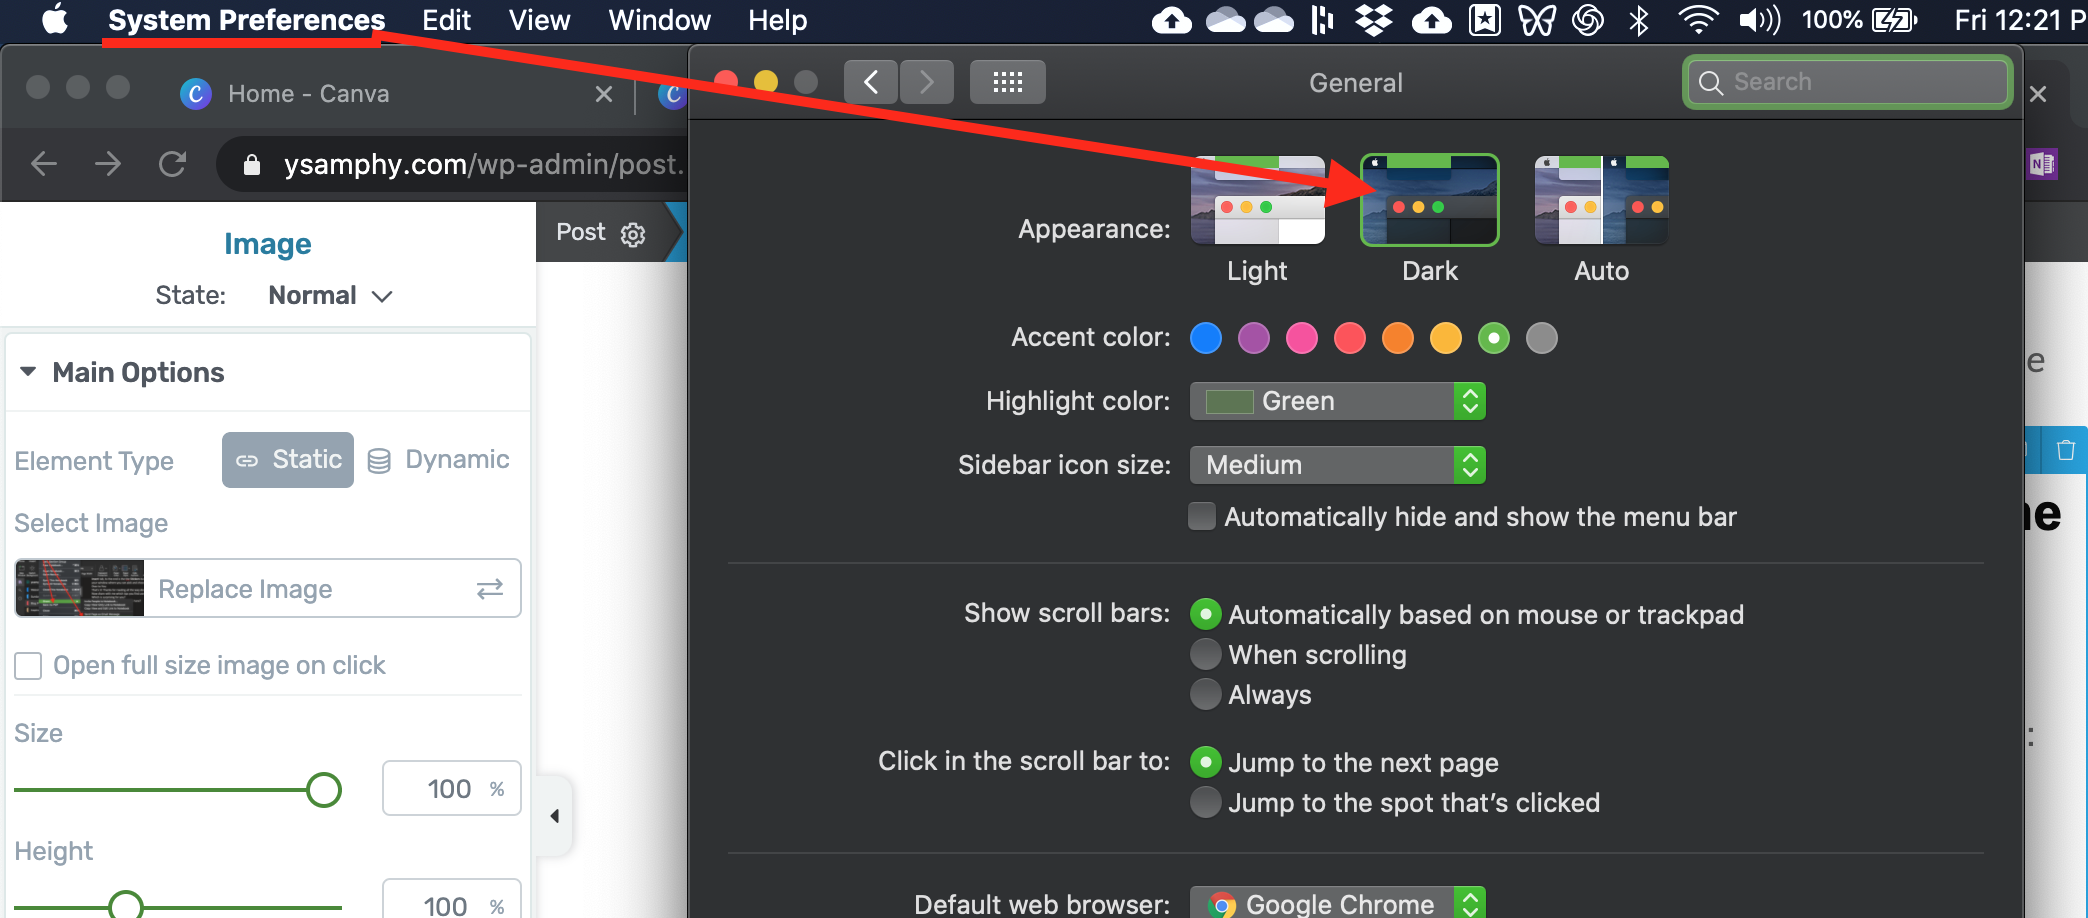
How to use Dark Mode in OneNote
When you now open OneNote on your Mac, it will appear in Dark Mode. If you choose Auto, your Mac (and OneNote accordingly) automatically run on Light Mode during the day and switch to Dark Mode at night.
When OneNote is in Dark Mode, you can switch the background of your page any time by clicking on View > Switch Background. What this does is switching your page background between dark and light mode.
29. The last OneNote productivity tip in this post: Add stickers and emojis
You might want to bring your notes to life by adding stickers and emojis. OneNote for Mac has these for you.
Adding emojis
There are two ways to add emojis:
- Go to Edit > Emoji & Symbols Then the emoji box appears wherever you place your cursor. Just pick any one you like.
- The second way is to use your keyboard shortcut. It is Control + Command + space bar.
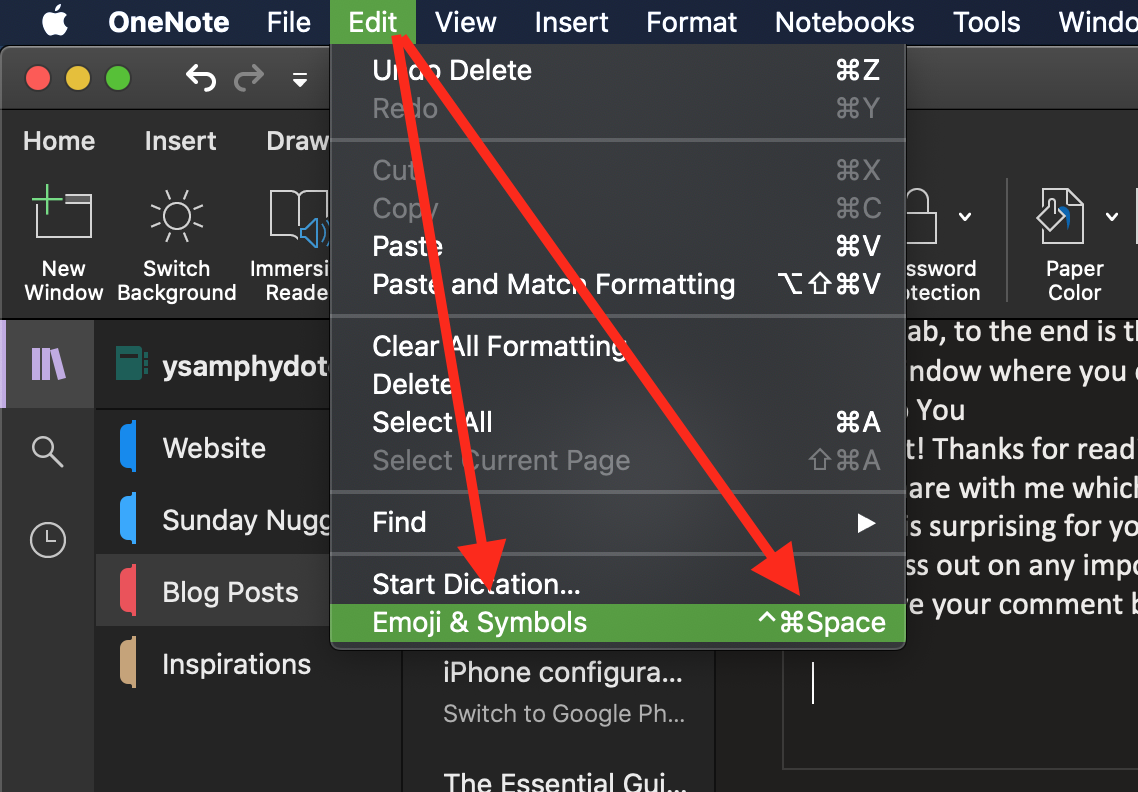
How to add emojis in OneNote
Inserting stickers in OneNote
To insert stickers to your note, on your menu bar, go to Insert > Stickers... Or click on the Insert tab, to the end is the the Stickers button. The Sticker pane will appears to the right of your window where you can pick and choose any stickers you like.
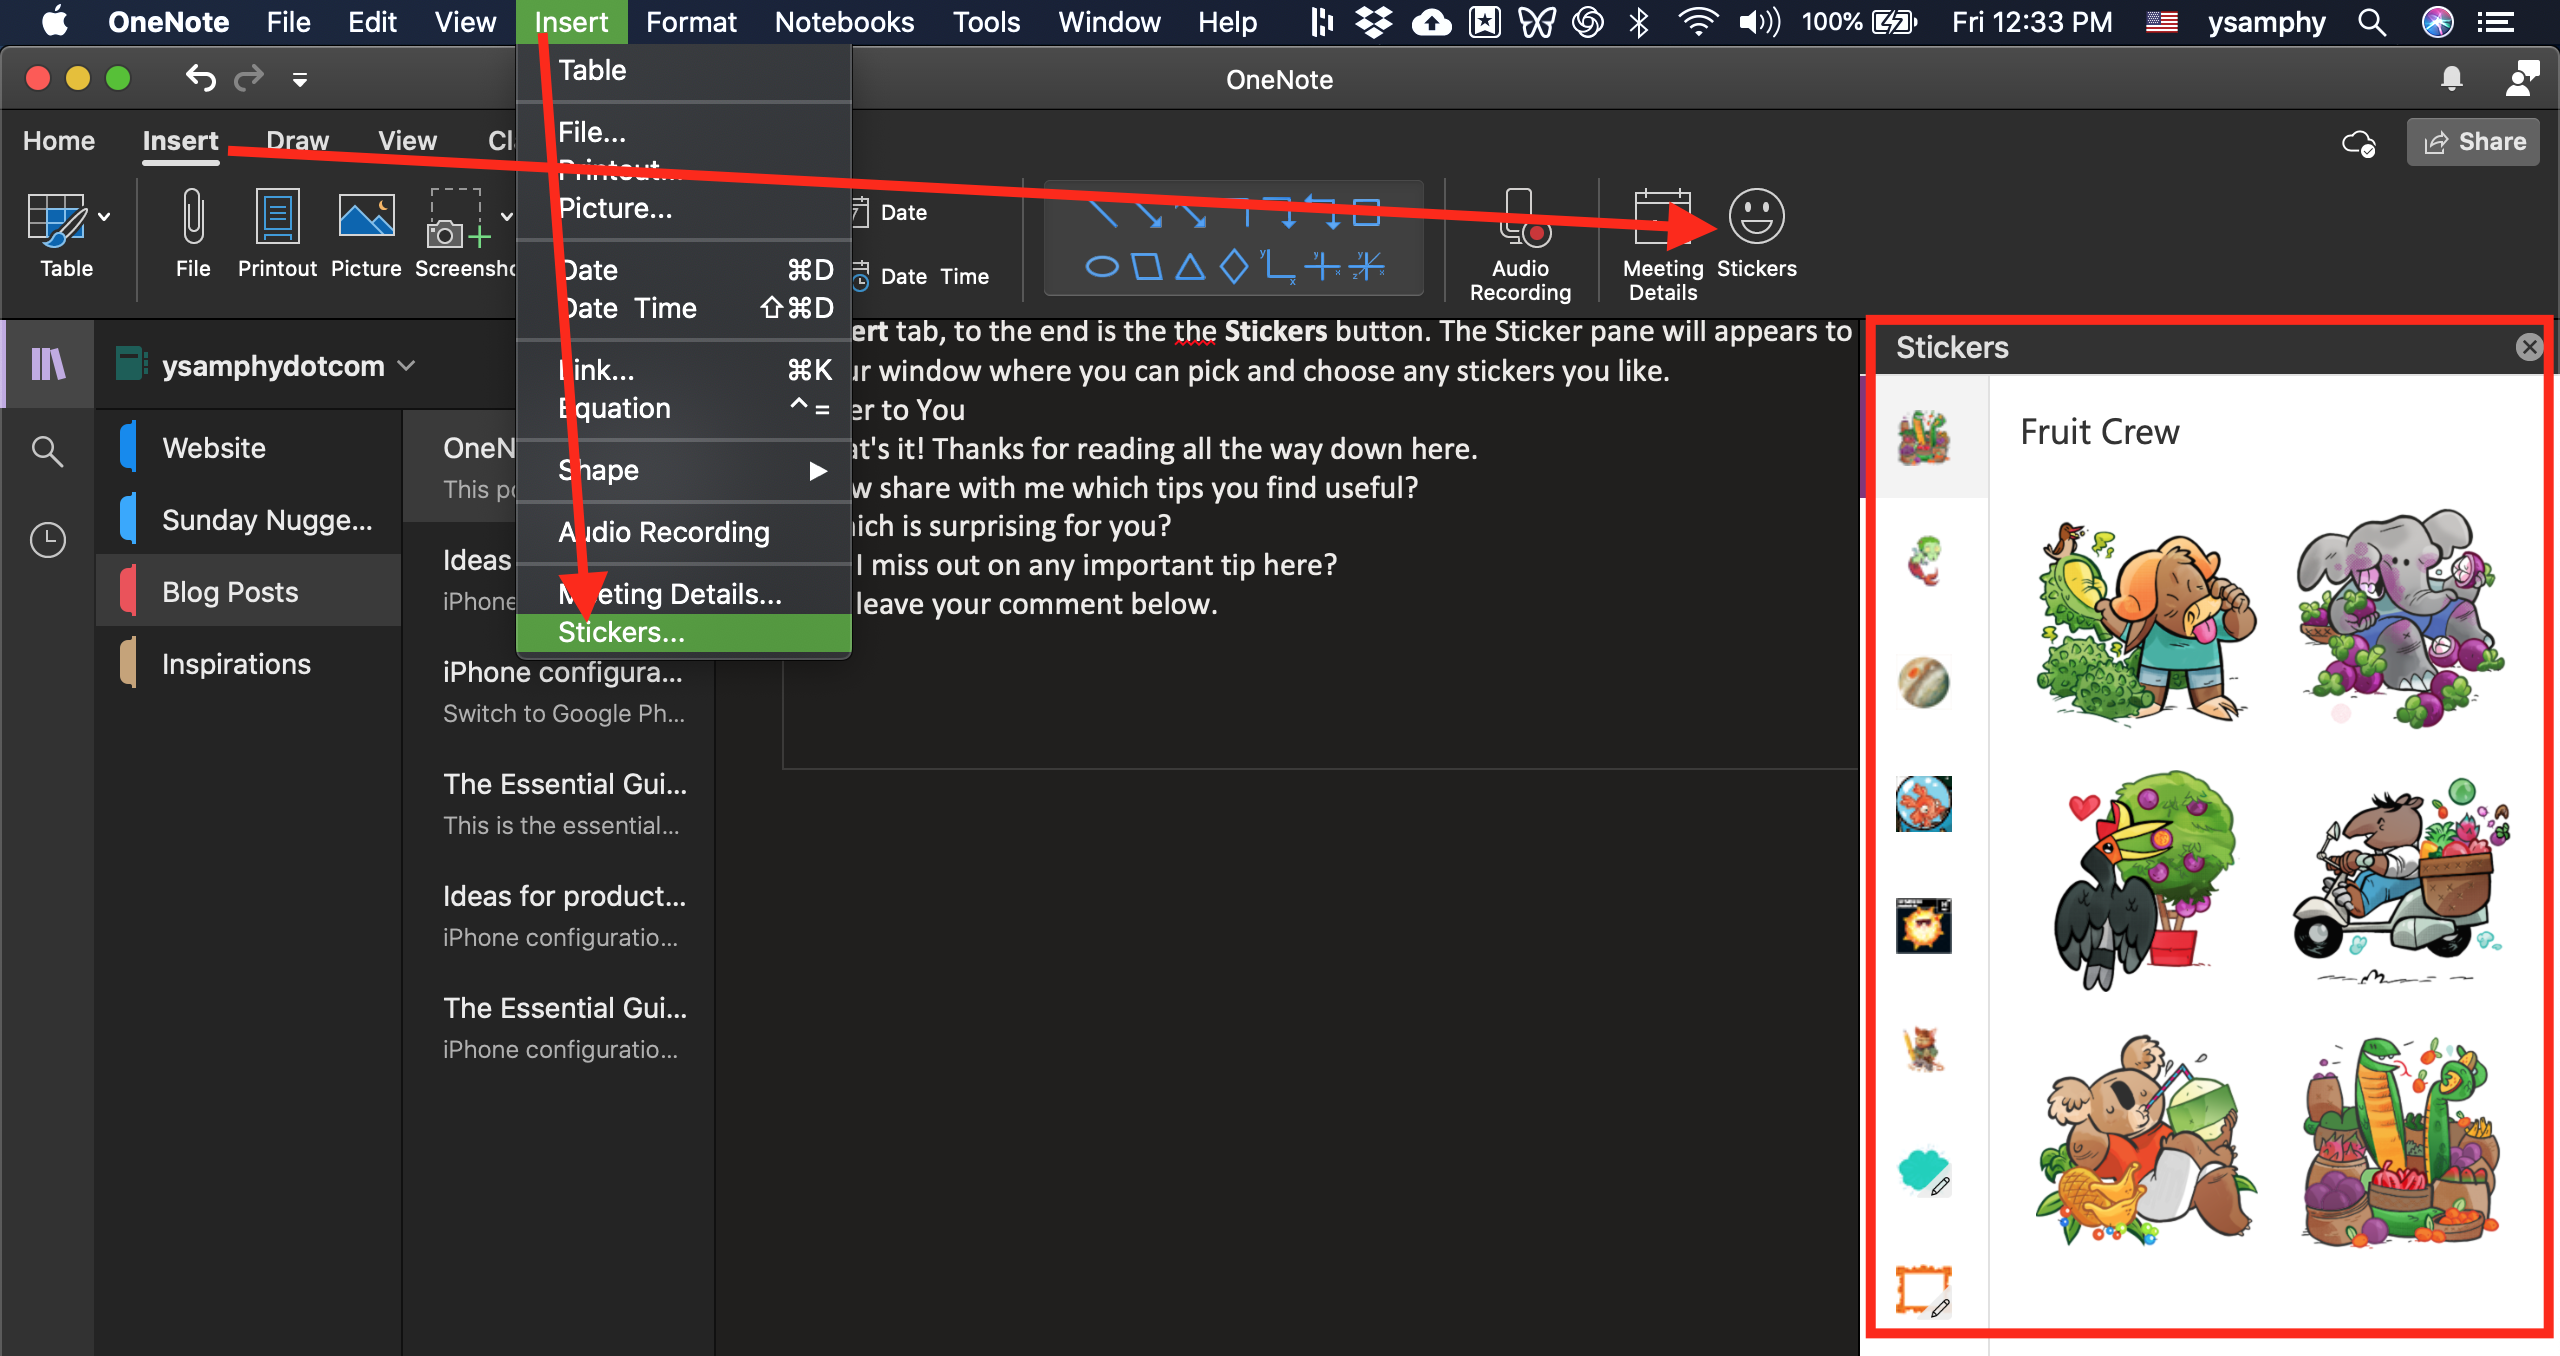
How to insert stickers in OneNote
Over to You
That's it! Thanks for reading all the way down here.
Now can you share with me which tips you find useful?
Which is surprising for you?
Do I miss out on any important tip here?
Leave your comment below.
Download The Essential Guide to Email Productivity!

Sign up below to get instant access to this free guide:
